Welcome

Please click Next Page below to begin. Then continue to use the buttons at the bottom of the window to navigate between pages. Do not use your browser’s Back or Refresh buttons.
System Requirements
For an optimal experience, please view this training program with one of the following:
- Microsoft® Windows® computer running Internet Explorer 8 or later, or the latest Chrome or Firefox browser
- Macintosh® computer running Safari 6 or later, or the latest Chrome or Firefox browser
- iPad® or other tablet with at least 1024x768 screen resolution
JavaScript must be enabled.
Please adjust window size to ensure the full pump display is visible.
Introduction

CADD®-Solis Ambulatory Infusion Pump
Pain management system that promotes patient care and safety
IV PCA, epidurals, surgical site and nerve blocks
Labor and delivery, trauma, critical care, pediatrics, PACU, medical-surgical and oncology
Learn to program the CADD®-Solis pump to deliver patient-specific therapy
Please read the CADD®-Solis Operator’s Manual for a complete listing of the indications, contraindications, warnings, and precautions
Reference materials are available at: www.smiths-medical.com
Click Next Page to continue.
1-01_01
Overview

Introduction
Click Next Page to continue.
2-01_00
Overview

Power Up Pump
Press and hold the power switch on the right side of the pump
The power up sequence begins, wait and watch for self-tests to complete and the pump to beep six times
If the display is faulty or alarm conditions exist, do not use the pump. Return the pump to the appropriate department for evaluation
Click Next Page to continue.
2-02_01
Overview

Power Up Pump
Play
Click Next Page to continue.
2-02_02
Overview
Pump Screen
Click Next Page to continue.
2-03_01
Overview

Pump Screen
To get to the Home Screen, press No
Click Next Page to continue.
2-03_02
Overview


Pump Screen
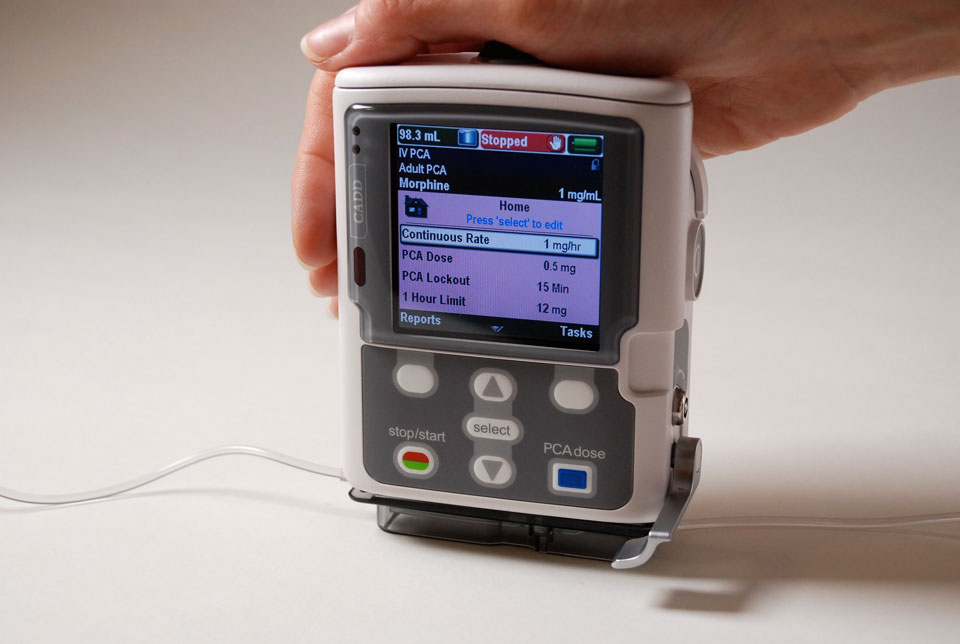
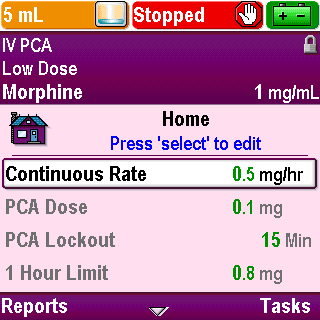
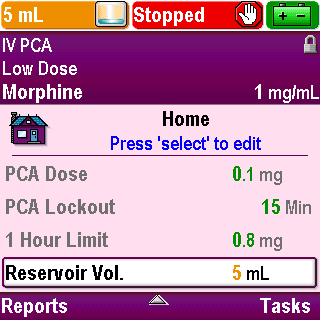
The Home Screen will be displayed
Notice the Home icon on the screen
Click Next Page to continue.
2-03_03
Overview

Pump Screen
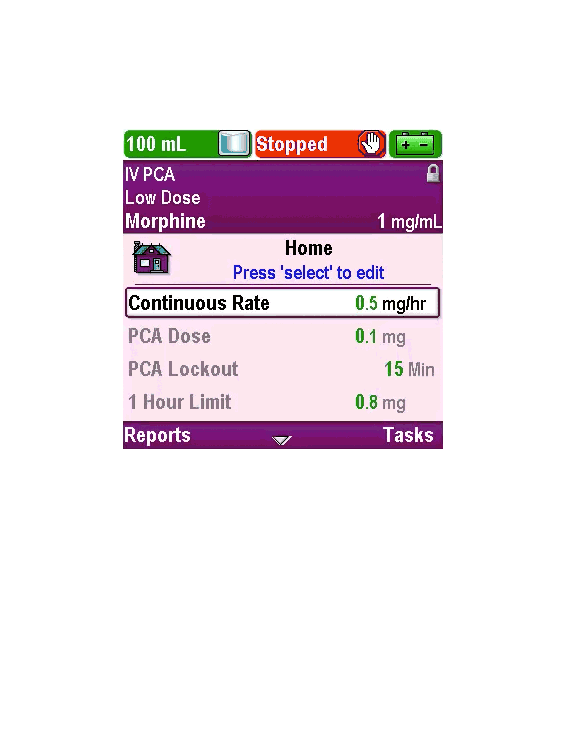
At the top of the screen is the status bar
Left side: Reservoir Volume
Center: Delivery Status
Right side: Battery Life or AC Power Status
At times, the status bar will briefly display informational messages such as “Cassette Latched”
Click Next Page to continue.
2-03_04
Overview

Pump Screen
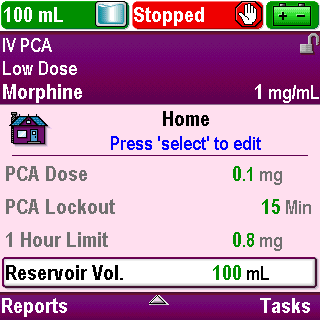
The reservoir volume value decreases as the pump delivers fluid. The reservoir volume should be reset each time the reservoir is changed
Color is used to display the status:
Green = acceptable volume
Amber = low volume
Red = empty (pump stops)
Click Next Page to continue.
2-03_05
Overview

Pump Screen
Color along with text provides information on the current delivery status of the pump
Color is used to display the status:
Green = pump is running
Amber = pump has paused due to an occlusion or delivery limit has been reached
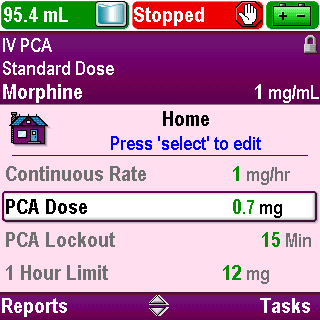
Red = pump is stopped
Text is used to provide more information on the status, for example:
Running
Stopped
Paused
Click Next Page to continue.
2-03_06
Overview


Pump Screen
Information about the current delivery status is also provided by the indicator lights to the left of the screen
The indicator lights can help you determine the pump status from a distance
Green flashing light = running
Amber flashing light = stopped
Both lights flashing = pump is running but needs attention
Click Next Page to continue.
2-03_07
Overview

Pump Screen
An icon along with the use of color indicates the power source and the power status
Power Source can be provided by:
AA batteries
Rechargeable battery pack
AC adapter
When using AC power, the batteries provide back-up power
Color used:
Green = acceptable battery power
Amber = low battery power
Red = depleted battery power
The icon will indicate battery power draw-down in increments of 25 percent
To save battery life, the screen goes dark after 30 seconds with no user interaction. Press any key, except the PCA/PCEA dose key, to turn the screen light on
When using an AC adapter the screen will remain lit at all times
Click Next Page to continue.
2-03_08
Overview

Pump Screen
The Protocol Title Bar is located below the Status Bar
It lists the therapy, qualifier and drug, including units of measure and concentration, if applicable, of the protocol currently selected for use on the pump
The CADD®-Solis pump’s protocol library with the Therapy, Qualifier, and Drug programming sequence is designed to keep you focused on the individual needs of your patients, not just the drug delivered
The pump displays the protocol title with the drug name at all times
Your facility may choose to color code protocols to help differentiate therapies
Click Next Page to continue.
2-03_09
Overview
Pump Screen
A change in the background color to black provides a clear indication of when a protocol has been significantly changed or that manual mode is in use
Click Next Page to continue.
2-03_09-01
Overview
Pump Screen
A lock icon is located on the right-hand side of the protocol title bar. This indicates whether the keypad is locked or unlocked
Click Next Page to continue.
2-03_10
Overview

Pump Screen
Below the Protocol Title Bar is the main portion of the screen
Click Next Page to continue.
2-03_11
Overview

Pump Screen
The name of the screen is displayed along with help text in blue font
Click Next Page to continue.
2-03_12
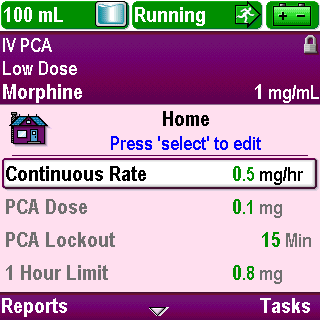
Overview

Pump Screen
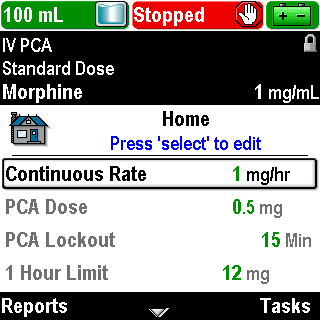
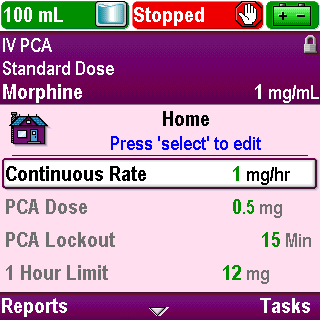
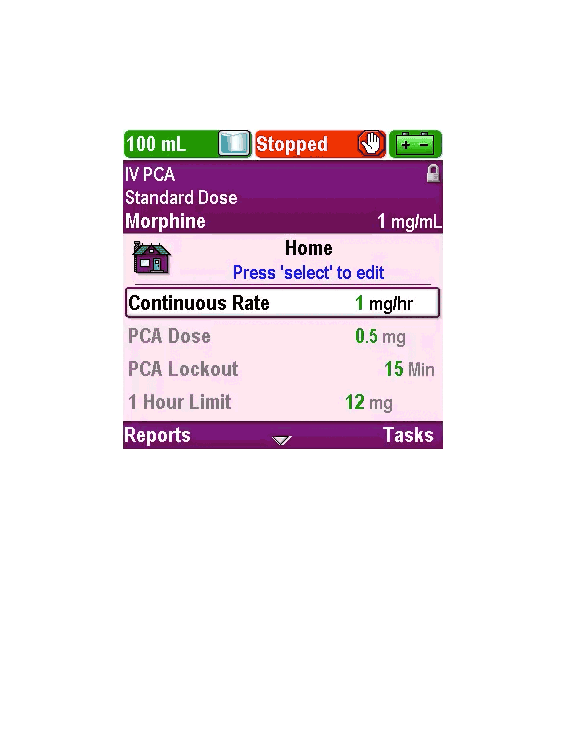
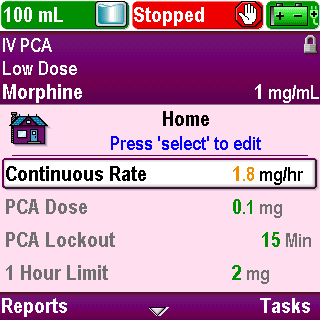
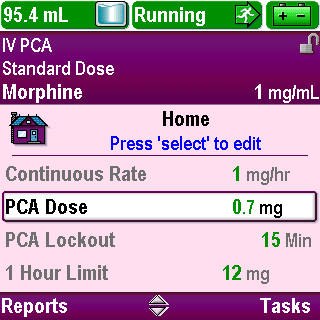
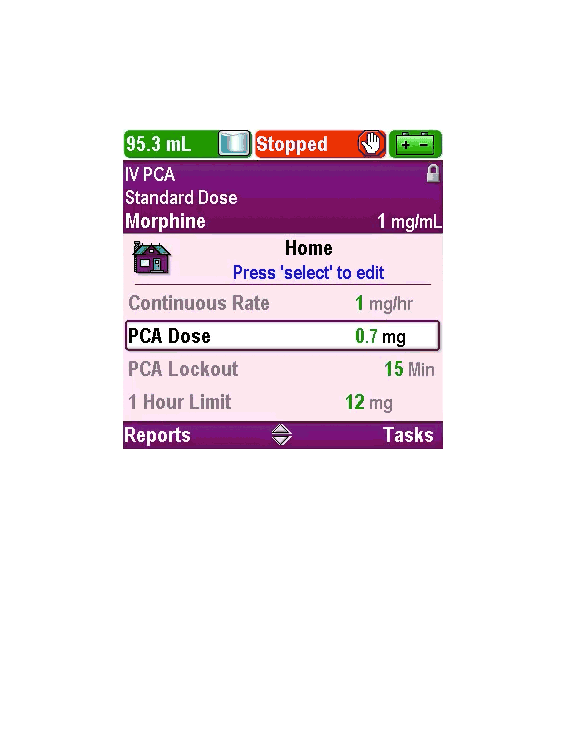
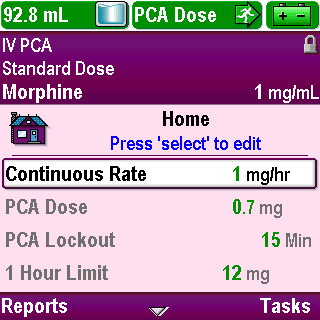
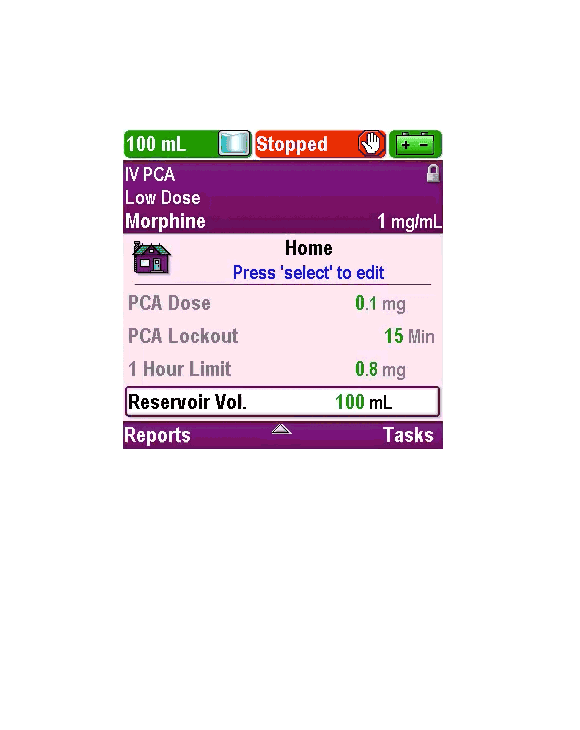
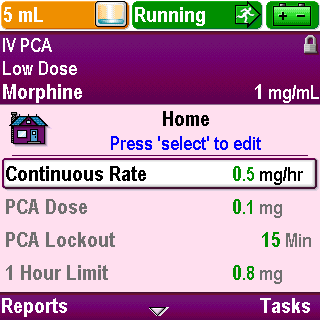
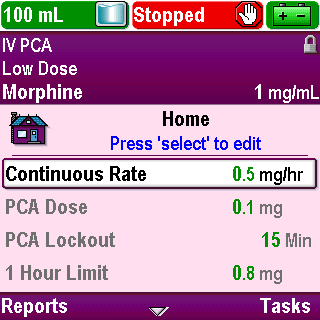
The home screen displays the current values of the patient specific parameters for the selected protocol
These settings can be edited as necessary and they determine how therapy is delivered to the patient
Click Next Page to continue.
2-03_13
Overview

Pump Screen
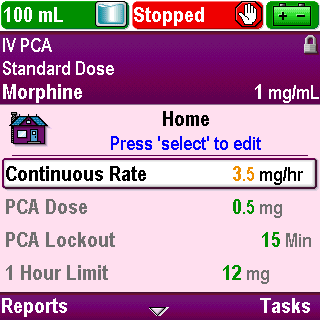
Use of color for specific programming values (green or amber) provides a clear indication of when a value is outside of a soft limit
Click Next Page to continue.
2-03_14
Overview

Pump Screen
The CADD®-Solis pump uses a task-based programming platform. Almost all programming activities are located under the Tasks menu
You will become familiar with the Tasks menu as you proceed through this training
Click Next Page to continue.
2-03_15
Overview

Keypad
Click Next Page to continue.
2-04_01
Overview
Keypad
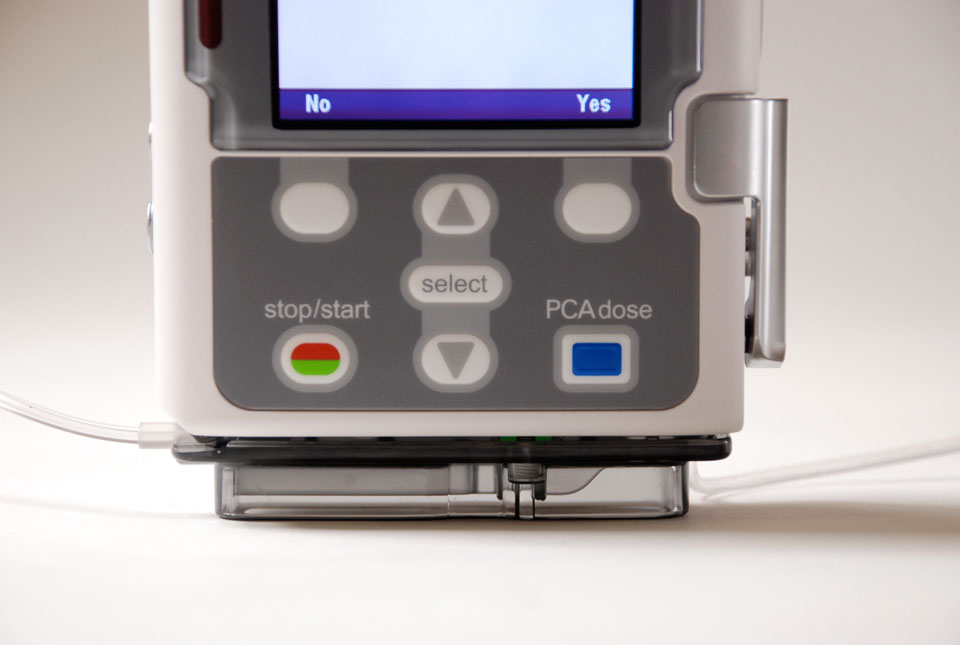
At the top of the keypad are the soft keys. The function of the soft keys will change from screen to screen, similar to cell phone technology
The soft keys allow you to navigate through pump screens and answer questions that appear on the pump display
Click Next Page to continue.
2-04_02
Overview
Keypad
For example, if the screen above the right soft key displays Yes, you can press that key to answer yes to the question on the screen
Click Next Page to continue.
2-04_02-01
Overview


Keypad
The up and down arrow keys allow you to navigate through pump screens or to edit values
The top arrow key scrolls up through a menu or increases a delivery parameter value
The down arrow key scrolls down through a menu or decreases a delivery parameter value
Click Next Page to continue.
2-04_03
Overview

Keypad
Small arrows are visible in the bottom center of the screen when the up and down arrow keys are available for use
Click Next Page to continue.
2-04_04
Overview

Keypad
The Select key in between the arrows is used to select a highlighted menu item
Most screens have instructions in blue text describing how to use the Select key on that particular screen when it has other functions
Click Next Page to continue.
2-04_05
Overview

Keypad
The PCA/PCEA dose key allows the patient to request a dose if permitted by the current protocol
This key will be inactive if the remote dose cord is plugged into the pump
Click Next Page to continue.
2-04_06
Overview

Keypad
The Stop/Start key will stop or start the infusion
Click Next Page to continue.
2-04_07
Overview
Unlock/Lock Keypad
Click Next Page to continue.
2-05_01
Overview
Unlock/Lock Keypad
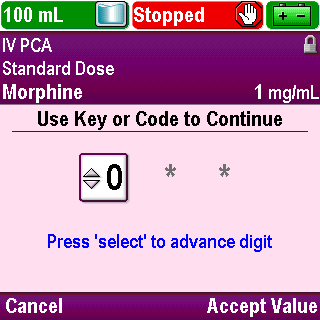
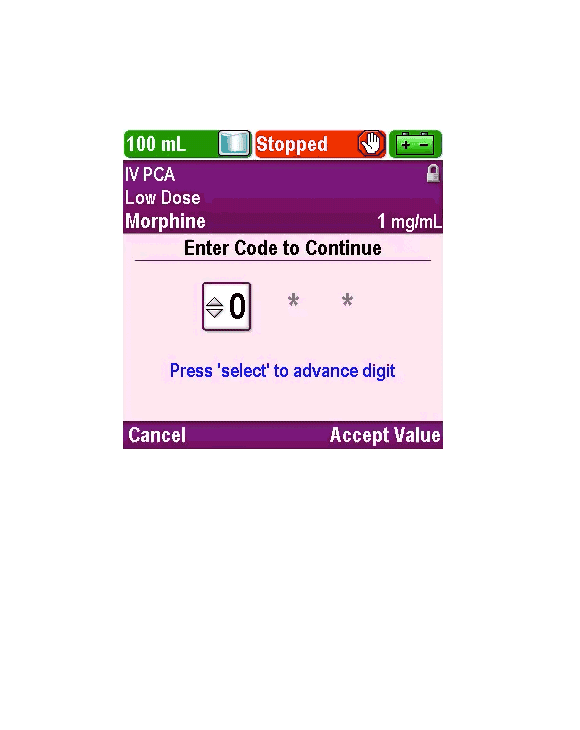
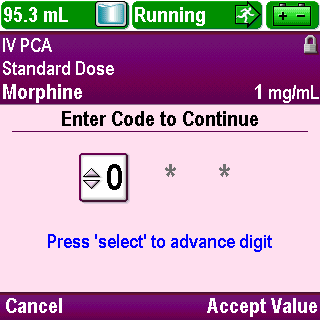
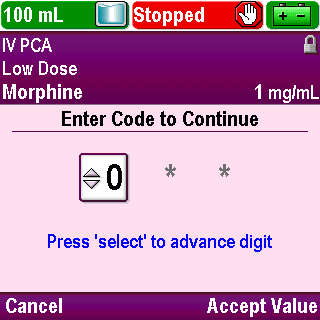
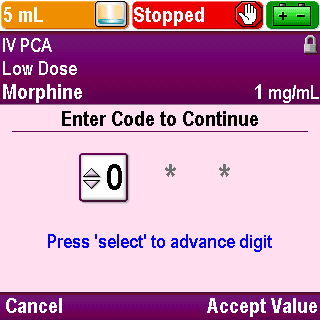
When a security code is required, the pump will present a screen on which you need to enter your code
To enter the security code:
Press the up or down arrow key to display the correct number
Click Next Page to continue.
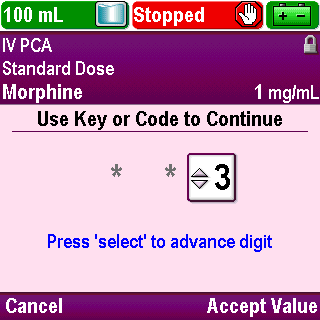
2-05_03
Overview
Unlock/Lock Keypad
Press Select or Accept Value to advance to the next number
Click Next Page to continue.
2-05_03-01
Overview
Unlock/Lock Keypad
Once the complete code has been entered, press Select or Accept Value
Click Next Page to continue.
2-05_03-02
Overview
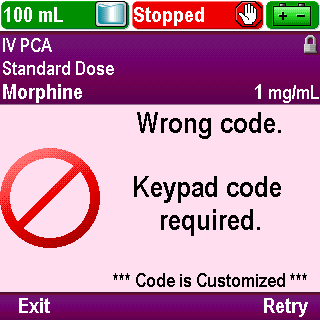
Unlock/Lock Keypad
If an incorrect code is entered, a “Wrong code” message is displayed. It includes the security level required to access the function
Press Retry to enter the code again
Click Next Page to continue.
2-05_04
Overview
Unlock/Lock Keypad
Play
Click Next Page to continue.
2-05_05
Overview

Unlock/Lock Keypad
You should always relock the keypad after making a program change
If a security code was used to unlock the keypad then, from the home screen, press the right soft key twice to lock the keypad
On the Home screen, press Tasks
Click Next Page to continue.
2-05_06
Overview
Unlock/Lock Keypad
On the Tasks menu screen, press Lock Keypad
Click Next Page to continue.
2-05_06-01
Overview

Unlock/Lock Keypad
If a pump key was used to unlock the keypad in run mode, turn the pump key clockwise to relock the cassette and keypad
Click Next Page to continue.
2-05_06-02
Overview

Unlock/Lock Keypad
Play
Click Next Page to continue.
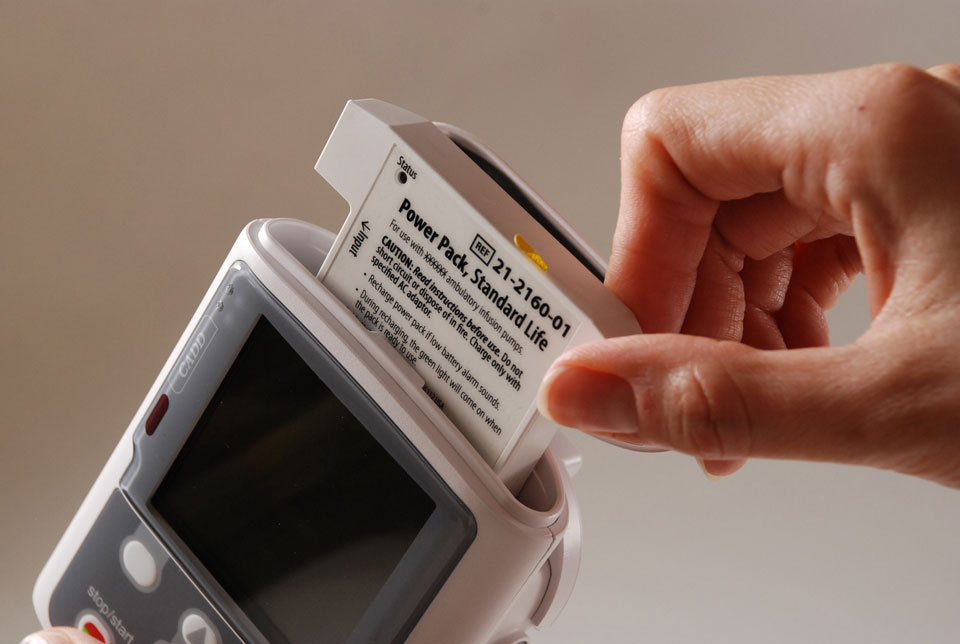
2-05_07
Overview
Accessories
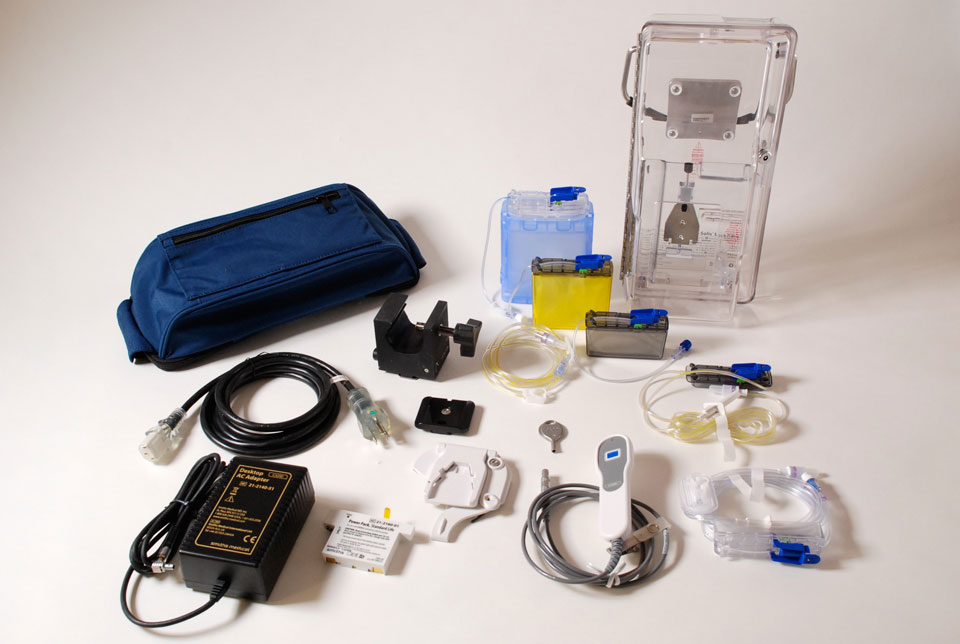
Pump accessories include:
Rechargeable battery pack
AC adapter
Remote Dose Cord
Polemount Bracket and Polemount Bracket Adapter
Polemount Swivel
Pump Key
Pouches and Backpacks
Lockbox
CADD™ Medication Cassette Reservoirs
CADD® Administration Sets
For more information, see the CADD®-Solis pump Operator’s Manual
Click Next Page to continue.
2-06_02
Overview
Review
The status bar at the top of the screen states if the pump is running or stopped.
True or False?
Click Next Page to continue.
2-07_01
Overview
Review
True:
The status bar at the top of the screen states if the pump is running or stopped. The colors red and green are also used in the status bar to help show the pump status.
Click Next Page to continue.
2-07_02
Overview
Review
The pump will only display the Therapy, Qualifier, and Drug name during pump programming.
True or False?
Click Next Page to continue.
2-07_03
Overview
Review
False:
The pump will display the Therapy, Qualifier, and Drug name in the protocol title bar area of the screen at all times.
Click Next Page to continue.
2-07_04
Overview
Review
A change in the background color to black indicates a significant change to a protocol has been made or that the manual mode is in use.
True or False?
Click Next Page to continue.
2-07_05
Overview
Review
True:
A change in the background color to black indicates a significant change to a protocol has been made or that the manual mode is in use.
Click Next Page to continue.
2-07_06
Overview
Review
The home screen displays the current values of the patient specific parameters for the selected protocol.
True or False?
Click Next Page to continue.
2-07_07
Overview
Review
True:
The home screen displays the current values of the patient specific parameters for the selected protocol.
Click Next Page to continue.
2-07_08
Overview
Review
The function of the soft keys does not change from screen to screen. The arrow keys must be used to navigate through pump screens and answer questions that appear on the screen.
True or False?
Click Next Page to continue.
2-07_09
Overview
Review
False:
The function of the soft keys will change from screen to screen. They allow navigation through pump screens and allow you to answer questions that appear on the screen. The scroll keys are used to scroll up or down in a menu and to increase or decrease a value.
Click Next Page to continue.
2-07_10
Pump Programming: PCA/PCEA Protocol
Introduction
Click Next Page to continue.
3-01_01
Pump Programming: PCA/PCEA Protocol

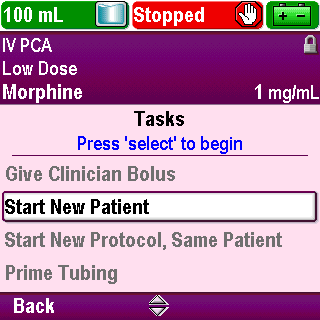
Start a New Patient
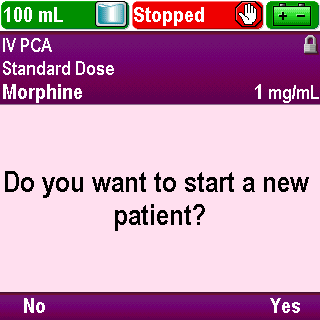
Begin programming one of two ways
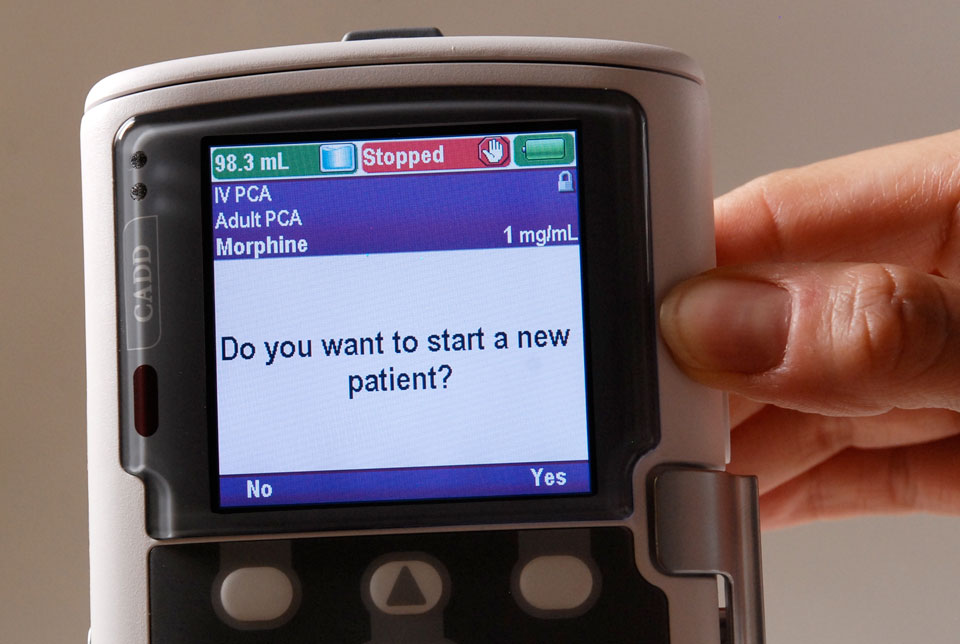
If you just powered up the pump, press Yes to “Do you want to start a new patient?”
Click Next Page to continue.
3-02_01
Pump Programming: PCA/PCEA Protocol
Start a New Patient
If you have previously powered up the pump and are on a different screen, return to the “Home” screen
From the “Home” screen, press Tasks
Click Next Page to continue.
3-02_02
Pump Programming: PCA/PCEA Protocol

Start a New Patient
Use the arrow keys to scroll up or down and highlight the “Start New Patient” task
Click Next Page to continue.
3-02_03
Pump Programming: PCA/PCEA Protocol

Start a New Patient
Press Select
Click Next Page to continue.
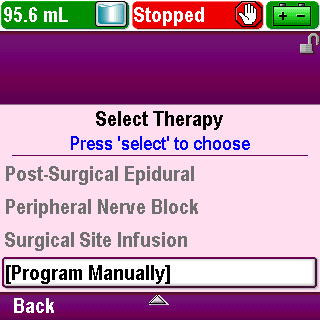
3-02_03-01
Pump Programming: PCA/PCEA Protocol

Start a New Patient
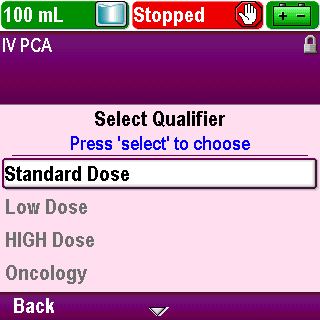
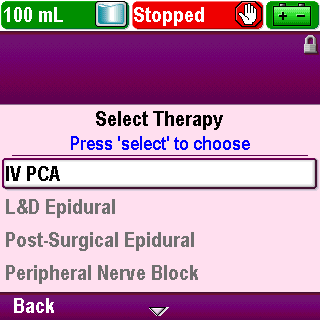
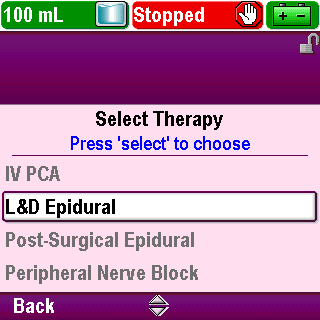
The “Select Therapy” screen appears
Use the arrow keys to scroll up or down and highlight the therapy name that matches the physician’s order
Click Next Page to continue.
3-02_04
Pump Programming: PCA/PCEA Protocol

Start a New Patient
Press Select
Click Next Page to continue.
3-02_04-01
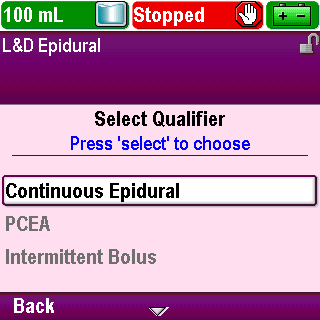
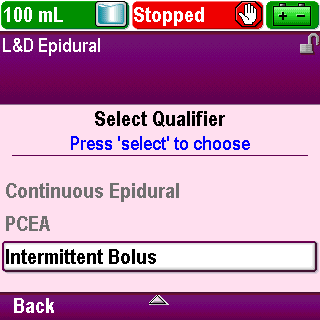
Pump Programming: PCA/PCEA Protocol

Start a New Patient
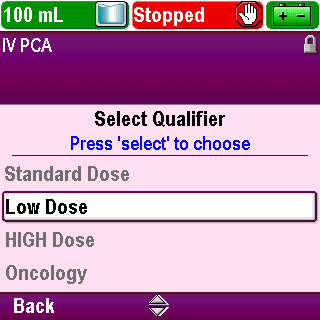
The “Select Qualifier” screen appears
Notice that the therapy name appears in the protocol title bar
Click Next Page to continue.
3-02_05
Pump Programming: PCA/PCEA Protocol
Start a New Patient
Use the arrow keys to scroll up or down and highlight the qualifier name that matches the physician’s order
Click Next Page to continue.
3-02_06
Pump Programming: PCA/PCEA Protocol

Start a New Patient
Press Select
Click Next Page to continue.
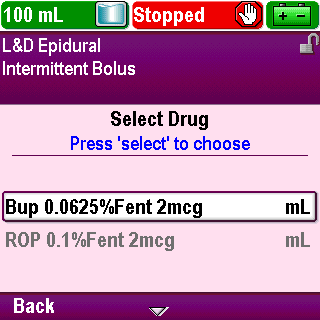
3-02_06-01
Pump Programming: PCA/PCEA Protocol
Start a New Patient
The “Select Drug” screen appears
Notice that the qualifier name appears in the protocol title bar
Click Next Page to continue.
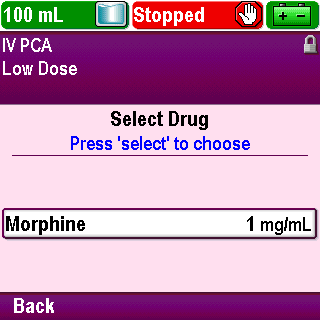
3-02_07
Pump Programming: PCA/PCEA Protocol
Start a New Patient
Use the arrow keys to scroll up or down and highlight the drug name, units of measure, and concentration that matches the physician’s order
Click Next Page to continue.
3-02_08
Pump Programming: PCA/PCEA Protocol
Start a New Patient
Press Select
Click Next Page to continue.
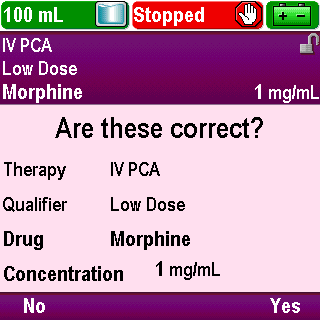
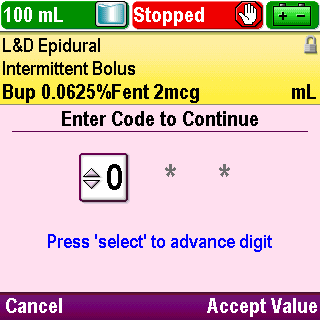
3-02_08-01
Pump Programming: PCA/PCEA Protocol

Start a New Patient
The drug name is added to the protocol title bar so that the complete protocol name is displayed
Click Next Page to continue.
3-02_09
Pump Programming: PCA/PCEA Protocol
Start a New Patient
You are prompted to enter the appropriate security code
Click Next Page to continue.
3-02_10
Pump Programming: PCA/PCEA Protocol
Start a New Patient
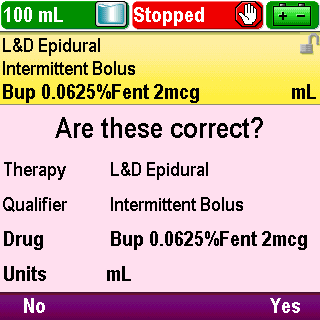
Once you enter the correct code, a confirmation screen is displayed
You are asked to confirm that the therapy, qualifier, drug and drug concentration are correct
Click Next Page to continue.
3-02_10-01
Pump Programming: PCA/PCEA Protocol
Start a New Patient
If any information is not correct, press No to return to the “Select Drug” screen
Click Next Page to continue.
3-02_11
Pump Programming: PCA/PCEA Protocol
Start a New Patient
You may select a new drug or press Back once to select a new qualifier or press Back twice to select a new therapy
Click Next Page to continue.
3-02_12
Pump Programming: PCA/PCEA Protocol
Start a New Patient
If the protocol name is correct, press Yes
Click Next Page to continue.
3-02_13
Pump Programming: PCA/PCEA Protocol
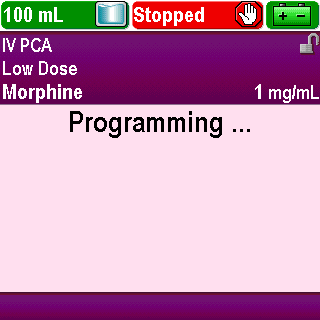
Start a New Patient
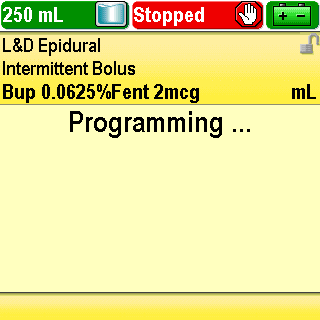
The pump will program the settings for the selected protocol
Click Next Page to continue.
3-02_14
Pump Programming: PCA/PCEA Protocol

Start a New Patient
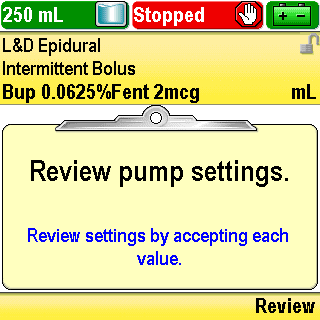
It will prompt you to do a review
Press Review
Click Next Page to continue.
3-02_14-01
Pump Programming: PCA/PCEA Protocol
Start a New Patient
Play
Click Next Page to continue.
3-02_15
Pump Programming: PCA/PCEA Protocol

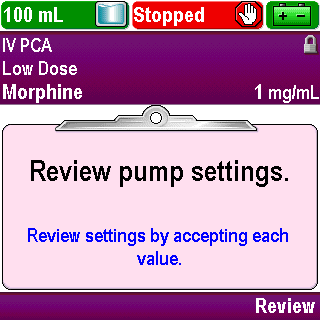
Review Pump Settings
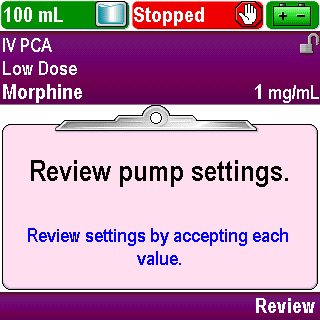
A screen is displayed with the current patient-specific pump settings on a clipboard background
You may review and edit the settings for your specific patient per the physician’s orders or you may press Exit to perform the review later
If you press Exit, the prompt to complete the review will appear after pressing the Stop/Start key to start the pump
Any new protocol selection or any edits made while the pump is stopped require a review to be completed before the pump will begin running
Click Next Page to continue.
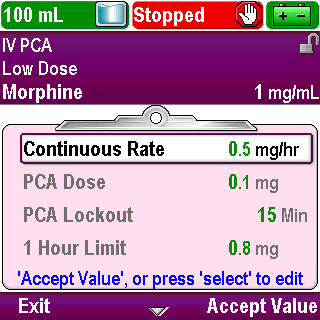
3-03_01
Pump Programming: PCA/PCEA Protocol

Review Pump Settings
For this training, the review will be done now
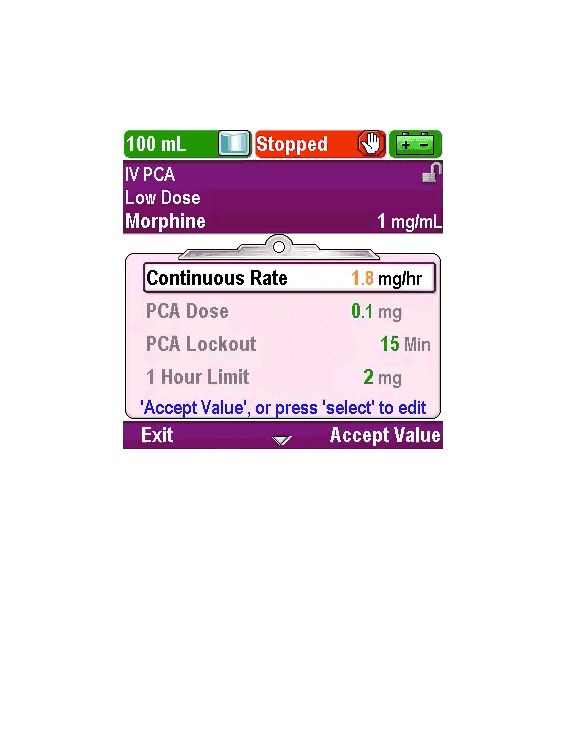
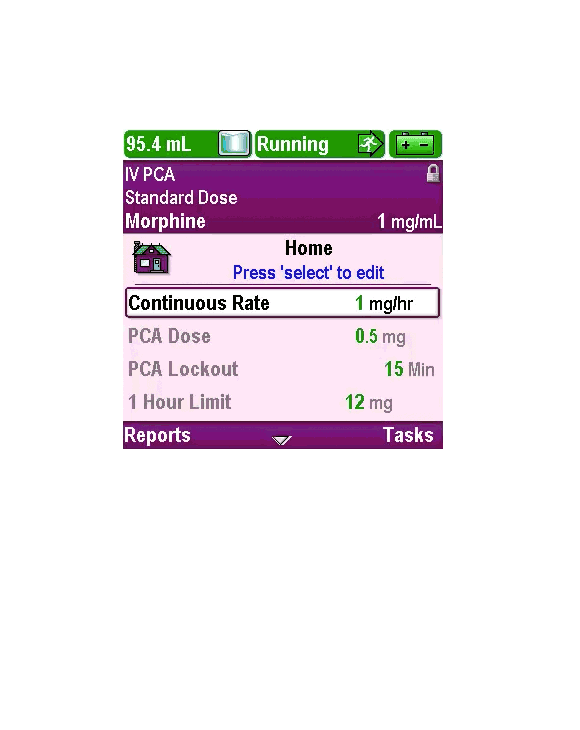
The first parameter is the “Continuous Rate”
Click Next Page to continue.
3-03_02
Pump Programming: PCA/PCEA Protocol

Review Pump Settings
If the value does not match the physician’s order, press Select to edit (note the blue help text on the screen)
Click Next Page to continue.
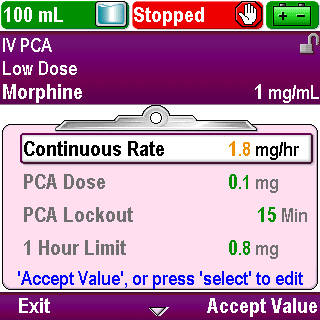
3-03_03
Pump Programming: PCA/PCEA Protocol
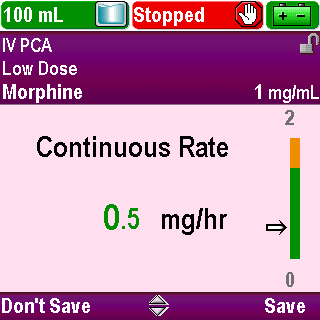
Review Pump Settings
The edit screen appears. The value is presented next to a green and/or amber bar graph
The amber area indicates the area outside of the soft limit range
Setting a value in the amber area will change the color of the value from green to amber
Click Next Page to continue.
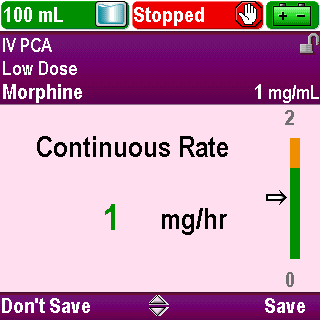
3-03_04
Pump Programming: PCA/PCEA Protocol

Review Pump Settings
Tall man-short man numeric display is used to help distinguish between whole numbers and decimals
Click Next Page to continue.
3-03_05
Pump Programming: PCA/PCEA Protocol
Review Pump Settings
Use the arrow keys to scroll the value up or down to match the physician’s order
You can press and hold down an arrow key to make the value change more quickly
Click Next Page to continue.
3-03_06
Pump Programming: PCA/PCEA Protocol
Review Pump Settings
If the value you select on the edit screen is within the soft limits, you need to press Save
Click Next Page to continue.
3-03_07
Pump Programming: PCA/PCEA Protocol
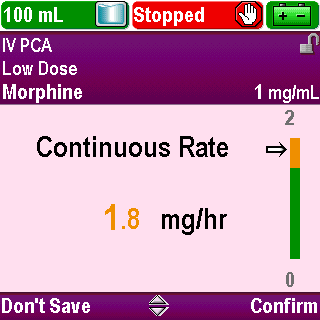
Review Pump Settings
If the value you select on the edit screen is outside the soft limits, you need to press Confirm
Click Next Page to continue.
3-03_08
Pump Programming: PCA/PCEA Protocol
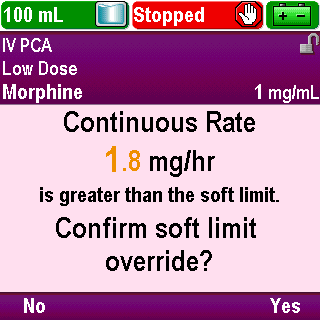
Review Pump Settings
You will be asked to confirm an override of a soft limit. Press Yes to save the value or press No to return to the edit screen
Click Next Page to continue.
3-03_09
Pump Programming: PCA/PCEA Protocol

Review Pump Settings
Play
Click Next Page to continue.
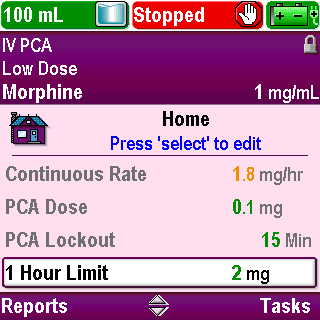
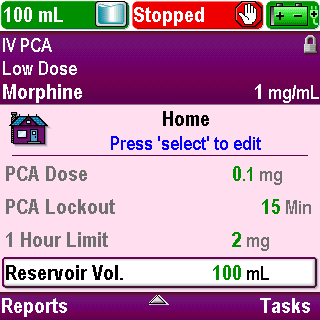
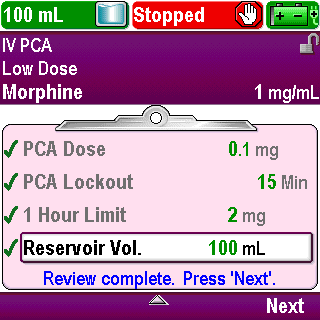
3-03_10
Pump Programming: PCA/PCEA Protocol
Review Pump Settings
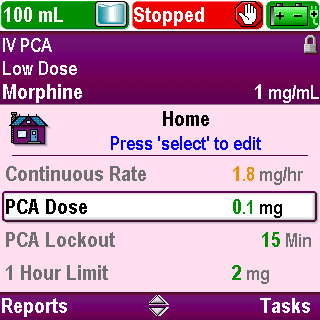
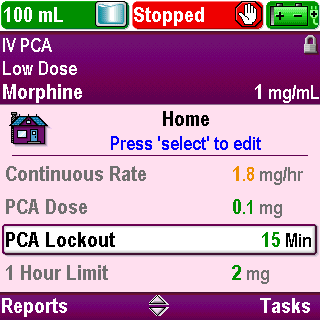
Use the arrow keys to scroll to each patient-specific parameter:
“PCA Dose”
“PCA Lockout”
“1 Hour Limit”
“Reservoir Vol.”
If any value needs to be edited to match the physician’s order, press Select and edit the value
Click Next Page to continue.
3-03_11
Pump Programming: PCA/PCEA Protocol
Review Pump Settings
Use the arrow keys to scroll to each patient-specific parameter:
“PCA Dose”
“PCA Lockout”
“1 Hour Limit”
“Reservoir Vol.”
If any value needs to be edited to match the physician’s order, press Select and edit the value
Click Next Page to continue.
3-03_11-01
Pump Programming: PCA/PCEA Protocol

Review Pump Settings
Use the arrow keys to scroll to each patient-specific parameter:
“PCA Dose”
“PCA Lockout”
“1 Hour Limit”
“Reservoir Vol.”
If any value needs to be edited to match the physician’s order, press Select and edit the value
Click Next Page to continue.
3-03_11-02
Pump Programming: PCA/PCEA Protocol

Review Pump Settings
Use the arrow keys to scroll to each patient-specific parameter:
“PCA Dose”
“PCA Lockout”
“1 Hour Limit”
“Reservoir Vol.”
If any value needs to be edited to match the physician’s order, press Select and edit the value
Click Next Page to continue.
3-03_11-03
Pump Programming: PCA/PCEA Protocol
Review Pump Settings
Use the arrow keys to scroll to each patient-specific parameter:
“PCA Dose”
“PCA Lockout”
“1 Hour Limit”
“Reservoir Vol.”
If any value needs to be edited to match the physician’s order, press Select and edit the value
Click Next Page to continue.
3-03_11-04
Pump Programming: PCA/PCEA Protocol
Accept Settings
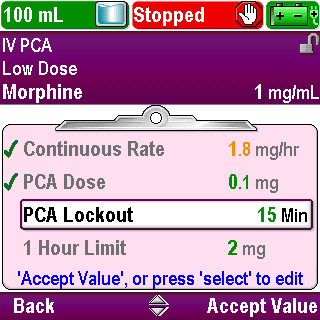
Once all values are correct, use the arrow keys to scroll up or down to highlight each parameter and press Accept Value
Click Next Page to continue.
3-04_01
Pump Programming: PCA/PCEA Protocol

Accept Settings
A green check mark will appear next to each value you accept
Depending on your facility’s policy, a second nurse may perform this step
All settings must be accepted before the infusion can be started
Click Next Page to continue.
3-04_02
Pump Programming: PCA/PCEA Protocol
Accept Settings
Once all values have been accepted, the review is complete
Press Next
Click Next Page to continue.
3-04_02-01
Pump Programming: PCA/PCEA Protocol
Accept Settings
Play
Click Next Page to continue.
3-04_03
Pump Programming: PCA/PCEA Protocol
Clinical Advisory Note
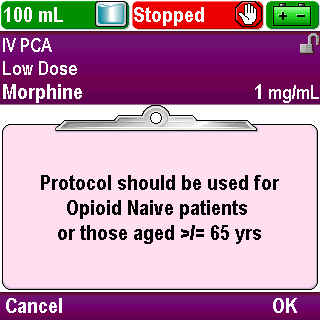
If a clinical advisory note has been entered for a protocol, it will appear on the screen after all values are accepted
Read the note and press OK
Click Next Page to continue.
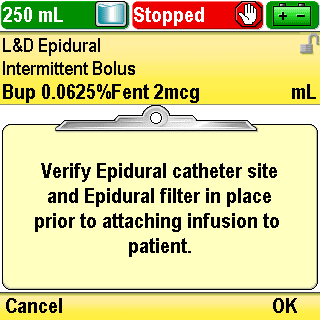
3-05_01
Pump Programming: PCA/PCEA Protocol
Clinical Advisory Note
You may press Cancel and review the settings and note later before starting the pump
If you have questions about the clinical advisory note, contact your CADD®-Solis system Administrator
Click Next Page to continue.
3-05_02
Pump Programming: PCA/PCEA Protocol
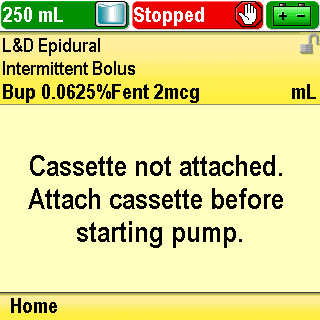
Next Steps
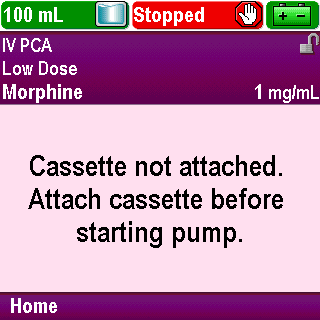
The screen will display a message that says “Cassette not attached. Attach cassette before starting pump.”
You can now attach a CADD™ Medication Cassette Reservoir or administration set to the pump, prime the tubing, attach the pump to the patient, and start the infusion
Click Next Page to continue.
3-06_01
Pump Programming: PCA/PCEA Protocol
Next Steps
Or you can press Home to return to the “Home” screen and complete these tasks later
These tasks are covered in the Operations section of this training program
Click Next Page to continue.
3-06_02
Pump Programming: PCA/PCEA Protocol
Review
One way to program the pump for a new patient is by selecting “Start New Patient” in the Tasks menu.
True or False?
Click Next Page to continue.
3-07_01
Pump Programming: PCA/PCEA Protocol
Review
True:
The other way to program the pump for a new patient is by powering on the pump and answering Yes to the question “Do you want to start a new patient”.
Click Next Page to continue.
3-07_02
Pump Programming: PCA/PCEA Protocol
Review
Confirmation is not required to save a value that is edited to be outside of a soft limit.
True or False?
Click Next Page to continue.
3-07_03
Pump Programming: PCA/PCEA Protocol
Review
False:
Confirmation is required to save a value that is edited to be outside of a soft limit. Once the value is confirmed, it will display on the screen in an amber color.
Click Next Page to continue.
3-07_04
Pump Programming: PCA/PCEA Protocol
Review
After programming the pump for a new patient, all the values must be accepted and any clinical advisory note must be acknowledged before the pump can be started.
True or False?
Click Next Page to continue.
3-07_05
Pump Programming: PCA/PCEA Protocol
Review
True:
If the review screen is exited before all values are accepted and/or the clinical advisory note is not acknowledged, the review must be repeated before the pump can be started. When the user presses the Stop/Start key to start the pump, the “Review pump settings” screen will appear and prompt the review to be completed.
Click Next Page to continue.
3-07_06
Pump Programming: IB Protocol

Introduction
Click Next Page to continue.
4-01_01
Pump Programming: IB Protocol

Start a New Patient
Begin programming one of two ways
If you just powered up the pump, press Yes to “Do you want to start a new patient?”
Click Next Page to continue.
4-02_01
Pump Programming: IB Protocol
Start a New Patient
If you have previously powered up the pump and are on a different screen, return to the “Home” screen
From the “Home” screen, press Tasks
Click Next Page to continue.
4-02_02
Pump Programming: IB Protocol
Start a New Patient
Use the arrow keys to scroll up or down and highlight the “Start New Patient” task
Click Next Page to continue.
4-02_03
Pump Programming: IB Protocol
Start a New Patient
Press Select
Click Next Page to continue.
4-02_03-01
Pump Programming: IB Protocol
Start a New Patient
The “Select Therapy” screen appears
Use the arrow keys to scroll up or down and highlight the therapy name that matches the physician’s order
Click Next Page to continue.
4-02_04
Pump Programming: IB Protocol
Start a New Patient
Press Select
Click Next Page to continue.
4-02_04-01
Pump Programming: IB Protocol
Start a New Patient
The “Select Qualifier” screen appears
Notice that the therapy name appears in the protocol title bar
Click Next Page to continue.
4-02_05
Pump Programming: IB Protocol
Start a New Patient
Use the arrow keys to scroll up or down and highlight the qualifier name that matches the physician’s order
Click Next Page to continue.
4-02_06
Pump Programming: IB Protocol
Start a New Patient
Press Select
Click Next Page to continue.
4-02_06-01
Pump Programming: IB Protocol
Start a New Patient
The “Select Drug” screen appears
Notice that the qualifier name appears in the protocol title bar
Click Next Page to continue.
4-02_07
Pump Programming: IB Protocol
Start a New Patient
Use the arrow keys to scroll up or down and highlight the drug name, units of measure, and concentration that matches the physician’s order
Click Next Page to continue.
4-02_08
Pump Programming: IB Protocol
Start a New Patient
Press Select
Click Next Page to continue.
4-02_08-01
Pump Programming: IB Protocol
Start a New Patient
The drug name is added to the protocol title bar so that the complete protocol name is displayed
Click Next Page to continue.
4-02_09
Pump Programming: IB Protocol
Start a New Patient
You are prompted to enter the appropriate security code
Click Next Page to continue.
4-02_10
Pump Programming: IB Protocol
Start a New Patient
Once you enter the correct code, a confirmation screen is displayed
You are asked to confirm that the therapy, qualifier, drug and drug concentration are correct
Click Next Page to continue.
4-02_11
Pump Programming: IB Protocol
Start a New Patient
If any information is not correct, press No to return to the “Select Drug” screen
Click Next Page to continue.
4-02_12
Pump Programming: IB Protocol
Start a New Patient
You may select a new drug or press Back once to select a new qualifier or press Back twice to select a new therapy
Click Next Page to continue.
4-02_13
Pump Programming: IB Protocol
Start a New Patient
If the protocol name is correct, press Yes
Click Next Page to continue.
4-02_14
Pump Programming: IB Protocol
Start a New Patient
The pump will program the settings for the selected protocol
Click Next Page to continue.
4-02_15
Pump Programming: IB Protocol
Start a New Patient
It will prompt you to do a review
Press Review
Click Next Page to continue.
4-02_15-01
Pump Programming: IB Protocol

Start a New Patient
Play
Click Next Page to continue.
4-02_16
Pump Programming: IB Protocol
Review Pump Settings
A screen is displayed with the current patient-specific pump settings on a clipboard background
You may review and edit the settings for your specific patient per the physician’s orders or you may press Exit to perform the review later
If you press Exit, the prompt to complete the review will appear after pressing the Stop/Start key to start the pump
Any new protocol selection or any edits made while the pump is stopped require a review to be completed before the pump will begin running
Click Next Page to continue.
4-03_01
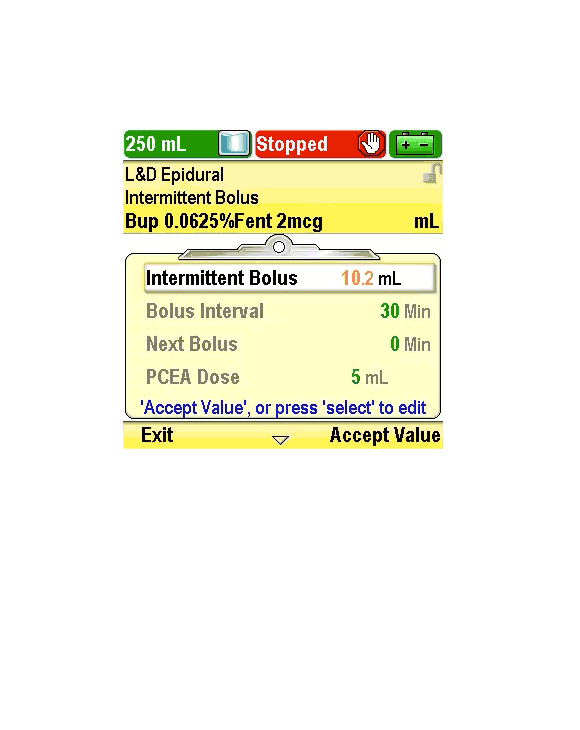
Pump Programming: IB Protocol
Review Pump Settings
For this training, the review will be done now
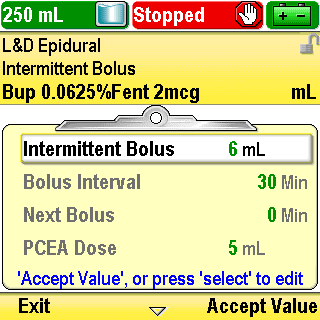
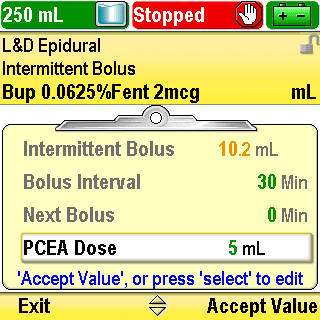
The first parameter is the “Intermittent Bolus”
The intermittent bolus is the infusion of a specific volume of drug at the programmed max delivery rate
Intermittent boluses are delivered at regular time intervals based on the programmed bolus interval
Click Next Page to continue.
4-03_02
Pump Programming: IB Protocol
Review Pump Settings
If the value does not match the physician’s order, press Select to edit (note the blue help text on the screen)
Click Next Page to continue.
4-03_03
Pump Programming: IB Protocol
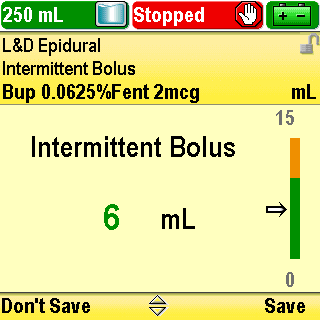
Review Pump Settings
The edit screen appears. The value is presented next to a green and/or amber bar graph
The amber area indicates the area outside of the soft limit range
Setting a value in the amber area will change the color of the value from green to amber
Click Next Page to continue.
4-03_04
Pump Programming: IB Protocol
Review Pump Settings
Use the arrow keys to scroll the value up or down to match the physician’s order
You can press and hold down an arrow key to make the value change more quickly
Click Next Page to continue.
4-03_05
Pump Programming: IB Protocol
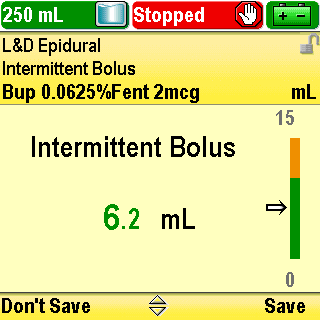
Review Pump Settings
Tall man-short man numeric display is used to help distinguish between whole numbers and decimals
Click Next Page to continue.
4-03_06
Pump Programming: IB Protocol
Review Pump Settings
If the value you select on the edit screen is within the soft limits, you need to press Save
Click Next Page to continue.
4-03_07
Pump Programming: IB Protocol

Review Pump Settings
If the value you select on the edit screen is outside the soft limits, you need to press Confirm
Click Next Page to continue.
4-03_08
Pump Programming: IB Protocol
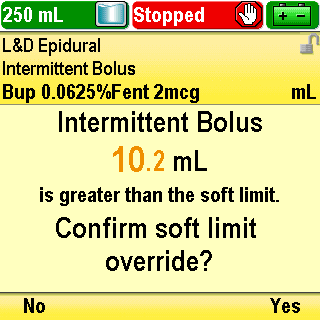
Review Pump Settings
You will be asked to confirm an override of a soft limit. Press Yes to save the value or press No to return to the edit screen
Click Next Page to continue.
4-03_09
Pump Programming: IB Protocol
Review Pump Settings
Play
Click Next Page to continue.
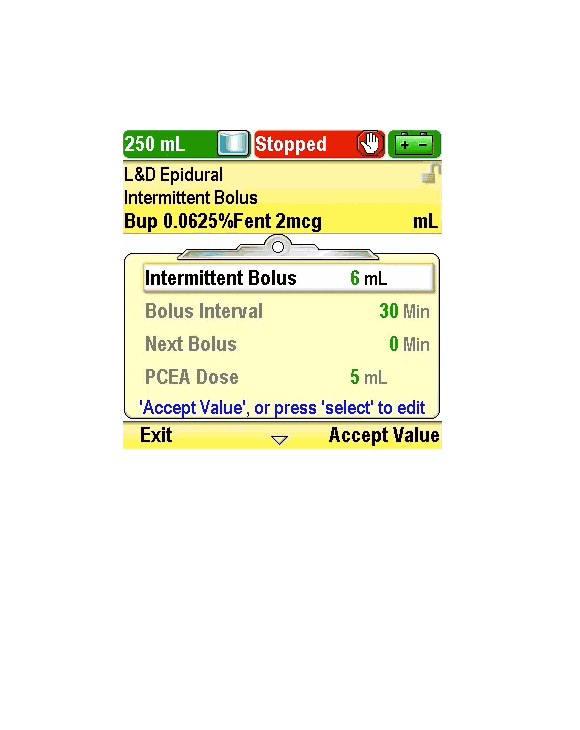
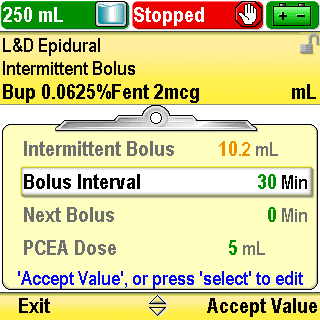
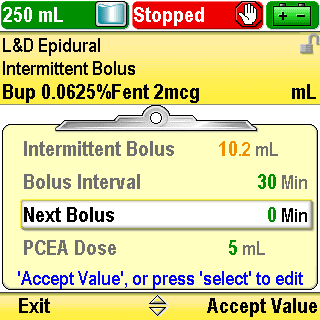
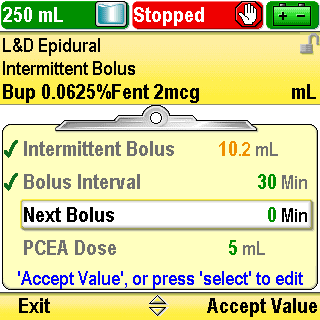
4-03_10
Pump Programming: IB Protocol
Review Pump Settings
Use the arrow keys to scroll to each patient-specific parameter:
Click Next Page to continue.
4-03_11
Pump Programming: IB Protocol
Review Pump Settings
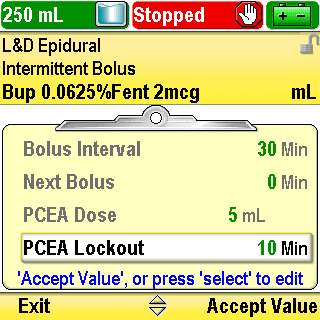
“Bolus Interval” is the amount of time that elapses from the beginning of one intermittent bolus to the beginning of the next intermittent bolus
Click Next Page to continue.
4-03_12
Pump Programming: IB Protocol
Review Pump Settings
“Next Bolus” is length of time between when the pump starts running and when the first intermittent bolus will be delivered
After the initial intermittent bolus is delivered, “Next Bolus” functions as a timer to count down the time remaining until the next intermittent bolus is programmed to deliver
Click Next Page to continue.
4-03_13
Pump Programming: IB Protocol
Review Pump Settings
NOTE:
The next bolus countdown does not begin until you start the pump. Once the pump has been started, the countdown continues even if the pump is subsequently stopped
The next bolus setting may be edited to adjust the timing of the next intermittent bolus as defined by the bolus interval. This can be done prior to beginning an infusion or during an infusion
For example, you can edit the next bolus setting to 0 minutes to immediately deliver an intermittent bolus. All subsequent intermittent bolus delivery times will be determined by the bolus interval
Click Next Page to continue.
4-03_14
Pump Programming: IB Protocol

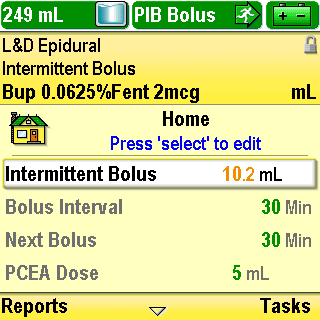
Review Pump Settings
NOTE:
When the next bolus is programmed to 0 Min and the pump is started, or when the pump is running and the next bolus has counted down and reaches 0 Min, the intermittent bolus delivery starts, “PIB bolus” is displayed in the status bar, and the next bolus time immediately resets to match the programmed bolus interval
Because the reset of the next bolus time occurs immediately, the value of 0 Min will only be seen if the pump is in stop mode
Click Next Page to continue.
4-03_15
Pump Programming: IB Protocol
Review Pump Settings
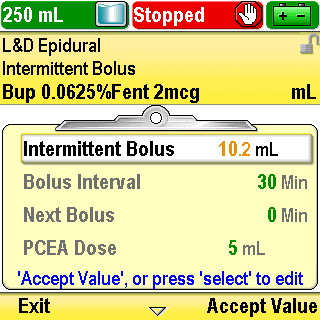
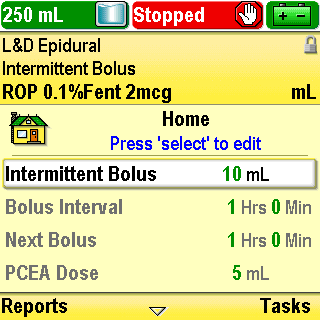
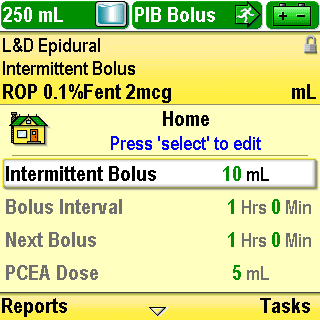
Here are two examples of when the pump will deliver the intermittent bolus dose and what the pump will display based on how the bolus interval and the next bolus are programmed:
Click Next Page to continue.
4-03_16
Pump Programming: IB Protocol
Review Pump Settings
If “Bolus Interval” is programmed to 1 Hrs 0 Min and “Next Bolus” is programmed to 1 Hrs 0 Min when the pump is started:
Click Next Page to continue.
4-03_17
Pump Programming: IB Protocol
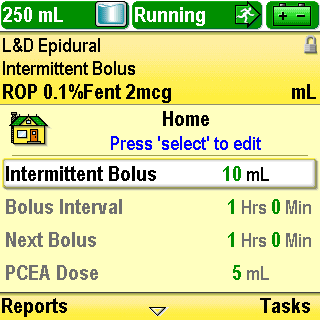
Review Pump Settings
The intermittent bolus will occur in 1 hour. The status bar will display “Running”. “Next Bolus” will display “1 Hrs 0 Min” and will count down as time passes
Click Next Page to continue.
4-03_17-01
Pump Programming: IB Protocol
Review Pump Settings
Play
Click Next Page to continue.
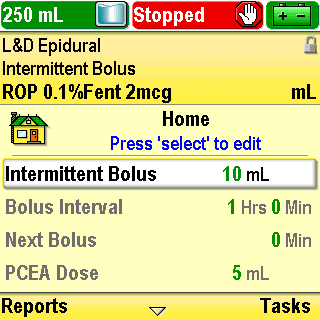
4-03_18
Pump Programming: IB Protocol
Review Pump Settings
If “Bolus Interval” is programmed to 1 Hrs 0 Min and “Next Bolus” is programmed to 0 Min when the pump is started:
Click Next Page to continue.
4-03_19
Pump Programming: IB Protocol
Review Pump Settings
The intermittent bolus will occur immediately upon starting the pump. The status bar will display “PIB Bolus”. “Next Bolus” will display “1 Hrs 0 Min” and will count down as time passes
Click Next Page to continue.
4-03_19-01
Pump Programming: IB Protocol

Review Pump Settings
Play
Click Next Page to continue.
4-03_20
Pump Programming: IB Protocol
Review Pump Settings
The “Next Bolus” parameter can be edited only when the pump is stopped
You must start the pump so it is running at the time the intermittent bolus is due to deliver
Click Next Page to continue.
4-03_21
Pump Programming: IB Protocol
Review Pump Settings
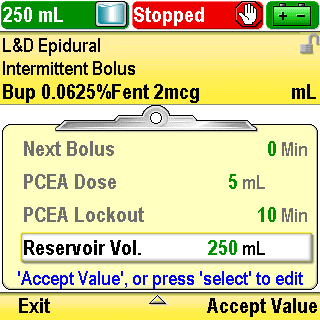
Continue to scroll to the rest of the patient-specific parameters:
“PCEA Dose”
“PCEA Lockout”
“Reservoir Vol.”
If any value needs to be edited to match the physician’s order, press Select and edit the value
Click Next Page to continue.
4-03_22
Pump Programming: IB Protocol
Review Pump Settings
Continue to scroll to the rest of the patient-specific parameters:
“PCEA Dose”
“PCEA Lockout”
“Reservoir Vol.”
If any value needs to be edited to match the physician’s order, press Select and edit the value
Click Next Page to continue.
4-03_22-01
Pump Programming: IB Protocol
Review Pump Settings
Continue to scroll to the rest of the patient-specific parameters:
“PCEA Dose”
“PCEA Lockout”
“Reservoir Vol.”
If any value needs to be edited to match the physician’s order, press Select and edit the value
Click Next Page to continue.
4-03_22-02
Pump Programming: IB Protocol
Review Pump Settings
Continue to scroll to the rest of the patient-specific parameters:
“PCEA Dose”
“PCEA Lockout”
“Reservoir Vol.”
If any value needs to be edited to match the physician’s order, press Select and edit the value
Click Next Page to continue.
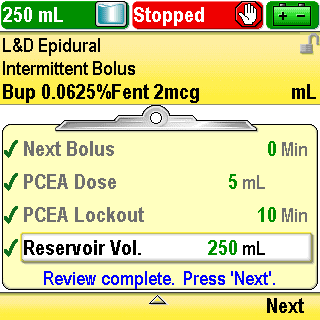
4-03_22-03
Pump Programming: IB Protocol
Accept Settings
Once all values are correct, use the arrow keys to scroll up or down to highlight each parameter and press Accept Value
Click Next Page to continue.
4-04_01
Pump Programming: IB Protocol
Accept Settings
A green check mark will appear next to each value you accept
Depending on your facility’s policy, a second nurse may perform this step
All settings must be accepted before the infusion can be started
Click Next Page to continue.
4-04_02
Pump Programming: IB Protocol
Accept Settings
Once all values have been accepted, the review is complete
Press Next
Click Next Page to continue.
4-04_02-01
Pump Programming: IB Protocol
Accept Settings
Play
Click Next Page to continue.
4-04_03
Pump Programming: IB Protocol
Clinical Advisory Note
If a clinical advisory note has been entered for a protocol, it will appear on the screen after all values are accepted
Read the note and press OK
Click Next Page to continue.
4-05_01
Pump Programming: IB Protocol
Clinical Advisory Note
You may press Cancel and review the settings and note later before starting the pump
If you have questions about the clinical advisory note, contact your CADD®-Solis system Administrator
Click Next Page to continue.
4-05_02
Pump Programming: IB Protocol
Next Steps
The screen will display a message that says “Cassette not attached. Attach cassette before starting pump.”
You can now attach a CADD™ Medication Cassette Reservoir or administration set to the pump, prime the tubing, attach the pump to the patient, and start the infusion
Click Next Page to continue.
4-06_01
Pump Programming: IB Protocol
Next Steps
Or you can press Home to return to the “Home” screen and complete these tasks later
These tasks are covered in the Operations section of this training program
Click Next Page to continue.
4-06_02
Pump Programming: IB Protocol
Review
One way to program the pump for a new patient is by selecting “Start New Patient” in the Tasks menu.
True or False?
Click Next Page to continue.
4-07_01
Pump Programming: IB Protocol
Review
True:
The other way to program the pump for a new patient is by powering on the pump and answering Yes to the question “Do you want to start a new patient”.
Click Next Page to continue.
4-07_02
Pump Programming: IB Protocol
Review
Confirmation is not required to save a value that is edited to be outside of a soft limit.
True or False?
Click Next Page to continue.
4-07_03
Pump Programming: IB Protocol
Review
False:
Confirmation is required to save a value that is edited to be outside of a soft limit. Once the value is confirmed, it will display on the screen in an amber color.
Click Next Page to continue.
4-07_04
Pump Programming: IB Protocol
Review
After programming the pump for a new patient, all the values must be accepted and any clinical advisory note must be acknowledged before the pump can be started.
True or False?
Click Next Page to continue.
4-07_05
Pump Programming: IB Protocol
Review
True:
If the review screen is exited before all values are accepted and/or the clinical advisory note is not acknowledged, the review must be repeated before the pump can be started. When the user presses the Stop/Start key to start the pump, the “Review pump settings” screen will appear and prompt the review to be completed.
Click Next Page to continue.
4-07_06
Pump Programming: IB Protocol
Review
Intermittent boluses are delivered at regular time intervals based on the programmed bolus interval when an intermittent bolus protocol is in use.
True or False?
Click Next Page to continue.
4-07_07
Pump Programming: IB Protocol
Review
True:
Intermittent boluses are delivered at regular time intervals based on the programmed bolus interval when an intermittent bolus protocol is in use.
Click Next Page to continue.
4-07_08
Pump Programming: IB Protocol
Review
Bolus Interval is the amount of time that elapses from the beginning of one intermittent bolus to the beginning of the next intermittent bolus.
True or False?
Click Next Page to continue.
4-07_09
Pump Programming: IB Protocol
Review
True:
Bolus Interval is the amount of time that elapses from the beginning of one intermittent bolus to the beginning of the next intermittent bolus.
Click Next Page to continue.
4-07_10
Pump Programming: IB Protocol
Review
Next Bolus functions as a timer to count down the time remaining until the next intermittent bolus is programmed to be delivered. It can be programmed to 0 min so that the intermittent bolus starts immediately when the pump is started or it can be programmed to a value greater than 0 min to delay the intermittent bolus by that value when the pump is started.
True or False?
Click Next Page to continue.
4-07_11
Pump Programming: IB Protocol
Review
True:
Next Bolus functions as a timer to count down the time remaining until the next intermittent bolus is programmed to be delivered. It can be programmed to 0 min so that the intermittent bolus starts immediately when the pump is started or it can be programmed to a value greater than 0 min to delay the intermittent bolus by that value when the pump is started.
Click Next Page to continue.
4-07_12
Additional Functions

Introduction
Click Next Page to continue.
5-01_00
Additional Functions
Edit Settings
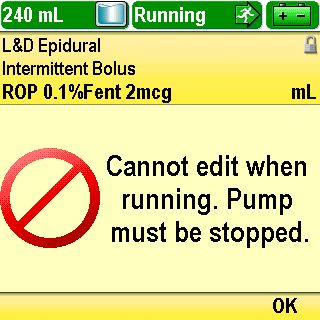
If you need to adjust an individual setting for a change in patient condition per a new physician’s order, you can edit any of the settings, except the “Reservoir Volume” (or “Next Bolus” if using an intermittent bolus protocol) while the pump is running
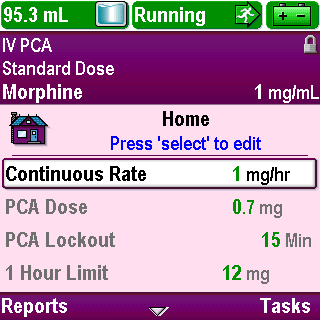
On the “Home” screen, use the arrow keys to scroll up or down to highlight the setting you want to edit
Click Next Page to continue.
5-02_01
Additional Functions

Edit Settings
Press Select
Click Next Page to continue.
5-02_02
Additional Functions

Edit Settings
Enter the security code, as outlined in the Overview section of this training
Click Next Page to continue.
5-02_03
Additional Functions
Edit Settings
On the edit screen, use the arrow keys to scroll to the correct value as ordered by the physician
Click Next Page to continue.
5-02_04
Additional Functions
Edit Settings
Press Save (or press Confirm if it is outside the soft limits)
Click Next Page to continue.
5-02_05
Additional Functions
Edit Settings
Relock the keypad by pressing the right soft key twice from the Home screen or using the pump key if one was used to unlock the pump
On the Home screen, press Tasks
Click Next Page to continue.
5-02_06
Additional Functions
Edit Settings
On the Tasks menu screen, press Lock Keypad
Click Next Page to continue.
5-02_06-01
Additional Functions
Edit Settings
Play
Click Next Page to continue.
5-02_07
Additional Functions

Edit Settings
If you stopped the pump to edit a setting and are ready to restart the infusion, press the Stop/Start key
Click Next Page to continue.
5-02_08
Additional Functions

Edit Settings
A prompt to review pump settings will display
Press Review
Click Next Page to continue.
5-02_09
Additional Functions
Edit Settings
Enter the security code, if prompted
Click Next Page to continue.
5-02_09-01
Additional Functions
Edit Settings
Use the arrow keys to scroll up or down and highlight each parameter
Click Next Page to continue.
5-02_10
Additional Functions
Edit Settings
Press Accept Value after confirming that the value is correct
Click Next Page to continue.
5-02_10-01
Additional Functions
Edit Settings
A green check mark will appear next to each value you accept
Depending on your facility’s policy, a second nurse may perform this step
All settings must be accepted before the infusion can be started
Click Next Page to continue.
5-02_11
Additional Functions
Edit Settings
Once the values have been accepted, press Next
Click Next Page to continue.
5-02_12
Additional Functions

Edit Settings
Acknowledge any clinical advisory note that may be entered for the selected protocol by pressing OK
(See this clinical advisory note example from the Pump Programming PCA/PCEA Protocol training section)
Click Next Page to continue.
5-02_12-01
Additional Functions
Edit Settings
Confirmation to start the pump will display
Press Yes to start the pump
Click Next Page to continue.
5-02_13
Additional Functions
Edit Settings
Play
Click Next Page to continue.
5-02_14
Additional Functions
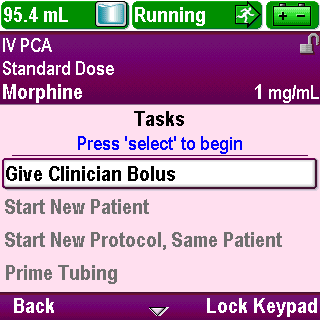
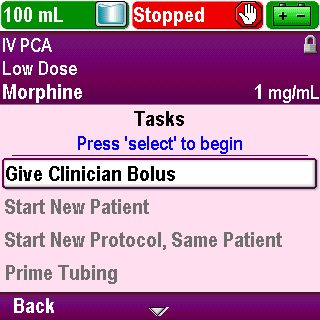
Clinician Bolus
You may give a clinician bolus to a patient, according to physician’s orders, if allowed by the selected protocol
A clinician bolus can be given at the start of an infusion as a loading dose, or at any time during the therapy
Pump must be running to administer a clinician bolus
Click Next Page to continue.
5-03_01
Additional Functions
Clinician Bolus
Press Tasks
Click Next Page to continue.
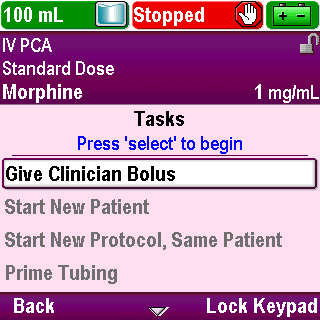
5-03_02
Additional Functions
Clinician Bolus
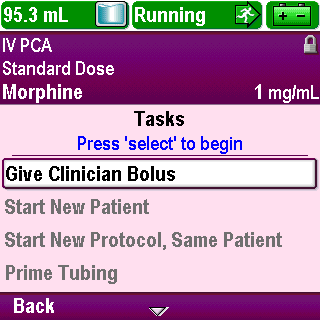
“Give Clinician Bolus” is the first task on the list and will be highlighted
Press Select
Click Next Page to continue.
5-03_03
Additional Functions
Clinician Bolus
Enter the security code as outlined in the Overview section of this training
If your code does not work, you may not have permission to deliver a clinician bolus
Do not give the security code to patients, caregivers or unauthorized personnel as there are no limits on the frequency of delivery of a clinician bolus
A clinician bolus is not added to the dose counters or to a delivery limit
Click Next Page to continue.
5-03_04
Additional Functions

Clinician Bolus
On the edit screen, use the arrow keys to scroll to the correct value as ordered by the physician
Never leave the pump unattended while on the edit screen
Click Next Page to continue.
5-03_05
Additional Functions
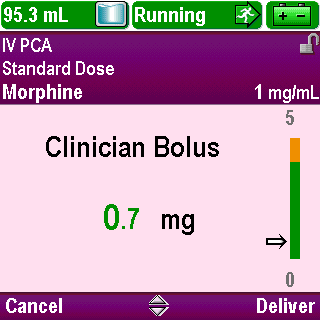
Clinician Bolus
If the value you select on the “Clinician Bolus” screen is within the soft limits, press Deliver to deliver the programmed value
Click Next Page to continue.
5-03_06
Additional Functions
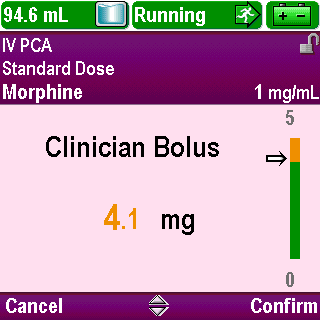
Clinician Bolus
If the value you select on the “Clinician Bolus” screen is outside the soft limits, press Confirm to deliver the programmed value
Click Next Page to continue.
5-03_07
Additional Functions
Clinician Bolus
Press Cancel to leave the screen
Click Next Page to continue.
5-03_08
Additional Functions
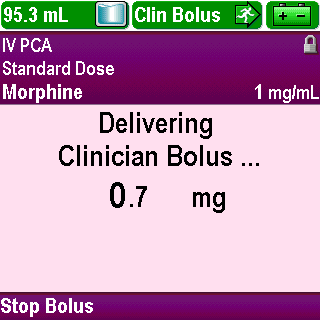
Clinician Bolus
The screen indicates the clinician bolus is delivering and text in the status bar confirms the delivery
Click Next Page to continue.
5-03_09
Additional Functions
Clinician Bolus
The value on the screen counts down until the bolus is complete
Click Next Page to continue.
5-03_09-01
Additional Functions
Clinician Bolus
The value on the screen counts down until the bolus is complete
Click Next Page to continue.
5-03_09-02
Additional Functions
Clinician Bolus
If you need to stop a bolus in progress, press Stop Bolus
Click Next Page to continue.
5-03_10
Additional Functions
Clinician Bolus
Confirm the stop by pressing Yes
Click Next Page to continue.
5-03_11
Additional Functions
Clinician Bolus
Play
Click Next Page to continue.
5-03_12
Additional Functions

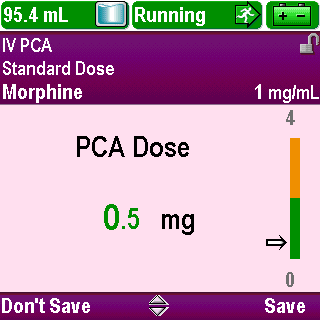
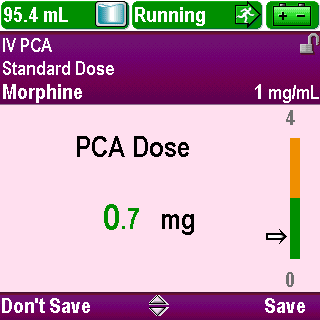
PCA/PCEA Dose
PCA/PCEA doses can be requested one of two ways if allowed by the selected protocol
The patient may press the blue PCA/PCEA dose key on the pump keypad or the button on the remote dose cord
If the remote dose cord is attached to the pump, the PCA/PCEA dose key on the pump keypad is inactive
Click Next Page to continue.
5-04_01
Additional Functions
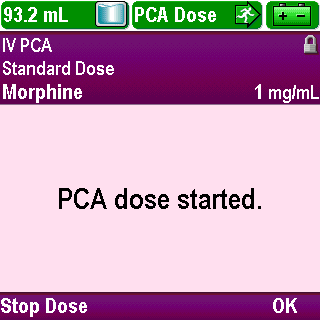
PCA/PCEA Dose
The screen will display a message that the PCA/PCEA dose has started
Click Next Page to continue.
5-04_01-01
Additional Functions
PCA/PCEA Dose
The status bar will display a message to indicate the PCA/PCEA dose is in progress
Click Next Page to continue.
5-04_01-02
Additional Functions
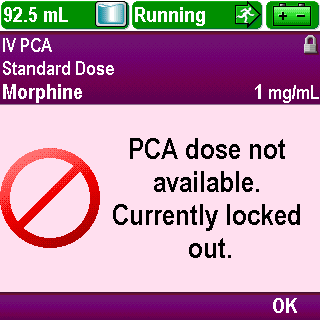
PCA/PCEA Dose
If a dose is not available, pressing the PCA/PCEA dose key generates a message indicating that a dose is not available
Click Next Page to continue.
5-04_02
Additional Functions
Manual Programming
The CADD®-Solis pump can be programmed manually, if necessary
Manual mode is designed to be used in unusual circumstances when an order is received which is different from any of the standard library protocols
Use of manual mode does not allow use of all the medication safety features built into the CADD®-Solis pump
Follow your facility’s policy for using the manual mode or contact the CADD®-Solis system Administrator with any questions
Click Next Page to continue.
5-05_01
Additional Functions
Review
To edit an individual parameter, highlight that parameter on the “Home” screen and press Select.
True or False?
Click Next Page to continue.
5-06_01
Additional Functions
Review
True:
To edit an individual parameter, highlight that parameter on the “Home” screen and press Select.
Click Next Page to continue.
5-06_02
Additional Functions
Review
If you edit an individual parameter while the pump is stopped, you will be required to review and accept all the values when you press Stop/Start to start the pump.
True or False?
Click Next Page to continue.
5-06_03
Additional Functions
Review
True:
If you edit an individual parameter while the pump is stopped, you will be required to review and accept all the values when you press Stop/Start to start the pump. If you edit an individual parameter while the pump is running, it will continue to run.
Click Next Page to continue.
5-06_04
Additional Functions
Review
The pump must be stopped to program a Clinician Bolus.
True or False?
Click Next Page to continue.
5-06_05
Additional Functions
Review
False:
The pump must be running in order to program a Clinician Bolus.
Click Next Page to continue.
5-06_06
Additional Functions
Review
If a PCA Dose Cord is attached to the pump, the patient can still use the PCA/PCEA dose key on the pump to request a dose.
True or False?
Click Next Page to continue.
5-06_07
Additional Functions
Review
False:
The PCA/PCEA dose key on the pump is inactive when a PCA Dose Cord is attached to the pump.
Click Next Page to continue.
5-06_08
Operations

Introduction
Click Next Page to continue.
6-01_00
Operations
Start/Stop Pump
To start the pump, press the Stop/Start key
Click Next Page to continue.
6-02_01
Operations
Start/Stop Pump
If patient specific parameters have not been reviewed and the values have not been accepted or the clinical advisory note has not been acknowledged, the pump requires you to do so before the pump will run
Review and accept the patient specific parameters as outlined in the Pump Programming sections of this training
Click Next Page to continue.
6-02_02
Operations

Start/Stop Pump
If a clinical advisory note has been defined by your facility for the selected protocol, it will appear after accepting all values
To acknowledge the clinical advisory note, press OK
Contact your CADD®-Solis system Administrator if you have questions about the clinical advisory note
Click Next Page to continue.
6-02_03
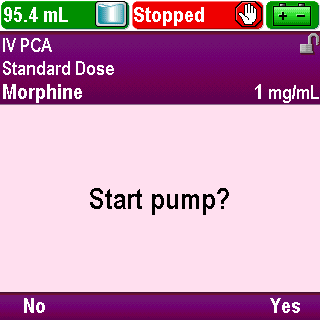
Operations
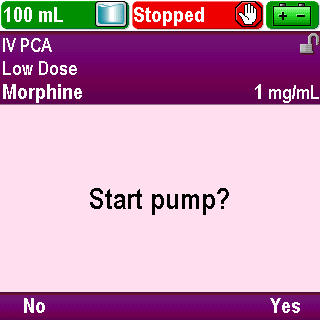
Start/Stop Pump
When “Start pump?” appears, press Yes
Click Next Page to continue.
6-02_04
Operations
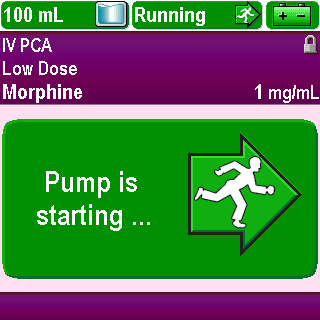
Start/Stop Pump
A message appears indicating the pump is starting
Click Next Page to continue.
6-02_05
Operations
Start/Stop Pump
The “Home” screen appears and the status bar indicates the pump is running with text and the color green
The flashing indicator light changes from amber to green
Click Next Page to continue.
6-02_06
Operations
Start/Stop Pump
Play
Click Next Page to continue.
6-02_07
Operations
Start/Stop Pump
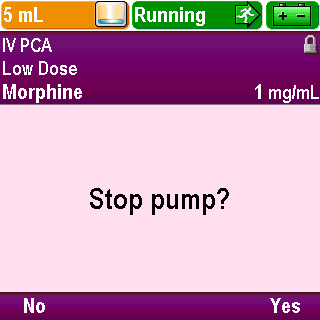
To stop the pump, press the Stop/Start key
Click Next Page to continue.
6-02_08
Operations
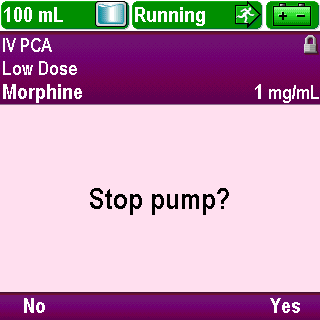
Start/Stop Pump
When “Stop Pump?” appears, press Yes
Click Next Page to continue.
6-02_09
Operations

Start/Stop Pump
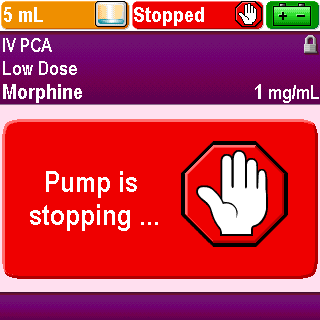
A message appears indicating the pump is stopping
Click Next Page to continue.
6-02_10
Operations
Start/Stop Pump
The home screen appears and the status bar indicates the pump is stopped with text and the color red
The flashing indicator light changes from green to amber
Click Next Page to continue.
6-02_11
Operations
Start/Stop Pump
Play
Click Next Page to continue.
6-02_12
Operations

Attach Cassette
Obtain a new, filled CADD™ Medication Cassette Reservoir or a CADD® Administration Set attached to a non-vented, flexible IV bag
Click Next Page to continue.
6-03_01
Operations

Attach Cassette
Clamp the tubing
Click Next Page to continue.
6-03_02
Operations
Attach Cassette
Remove the blue clip if necessary
Click Next Page to continue.
6-03_03
Operations

Attach Cassette
Power on the pump. This allows the pump to provide you with prompts to verify the cassette type, reset the reservoir volume if necessary, and prime the fluid path
Click Next Page to continue.
6-03_04
Operations
Attach Cassette
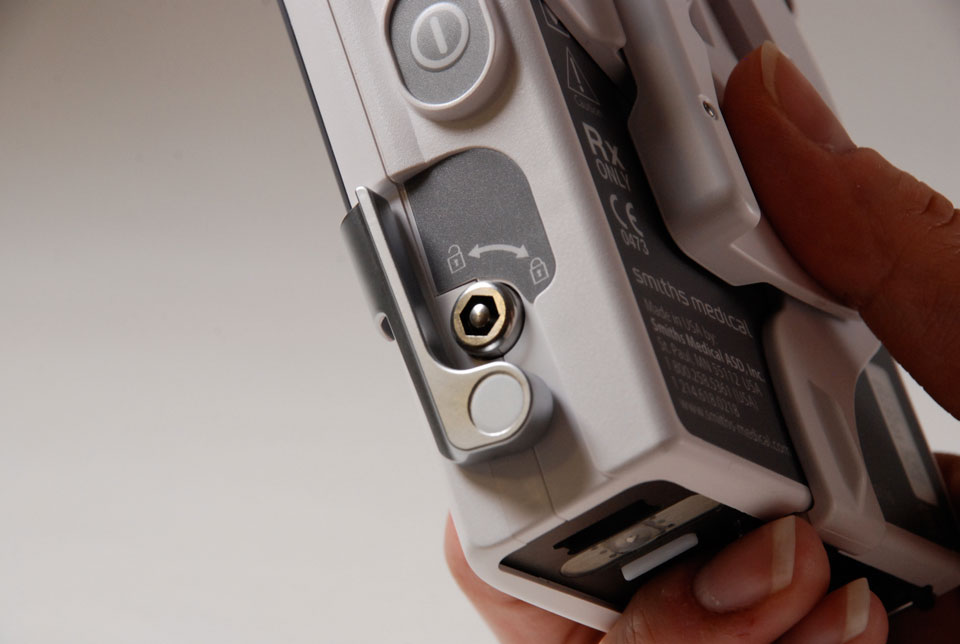
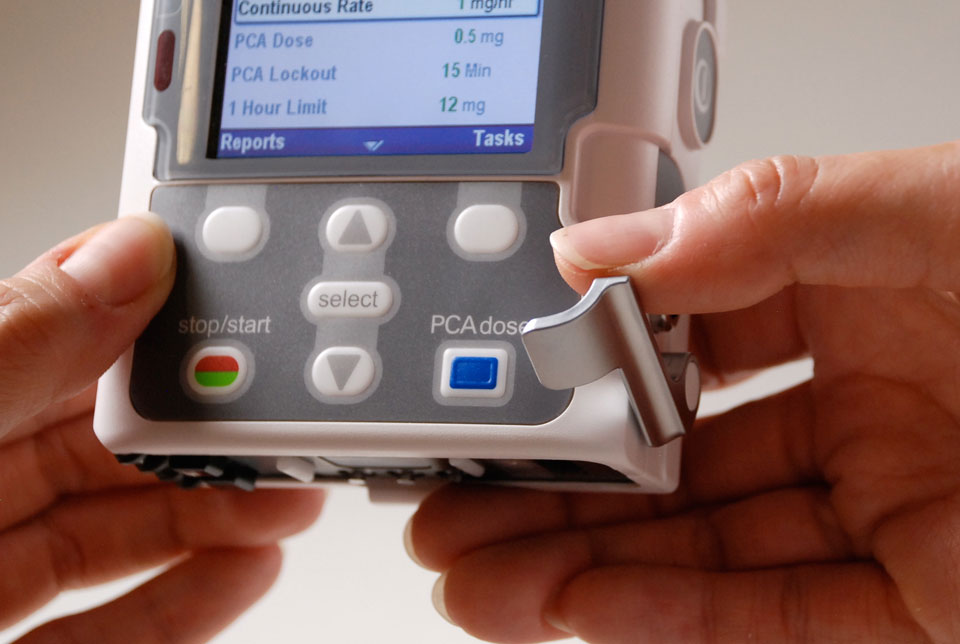
Make sure the cassette latch on the right side of the pump is unlocked
Click Next Page to continue.
6-03_05
Operations
Attach Cassette
Open the latch by pulling it toward you and down
Click Next Page to continue.
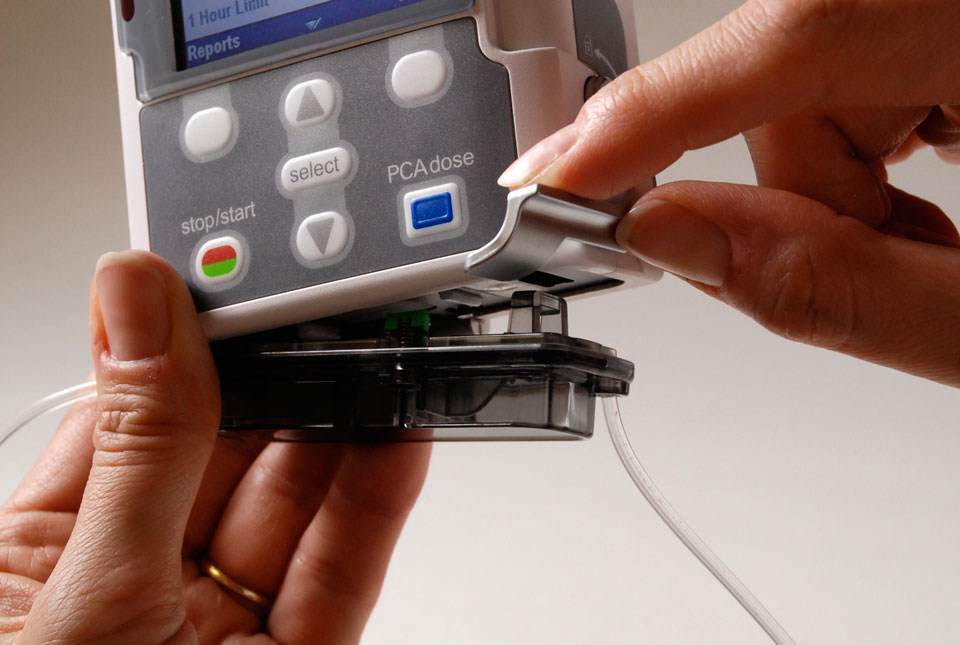
6-03_06
Operations
Attach Cassette
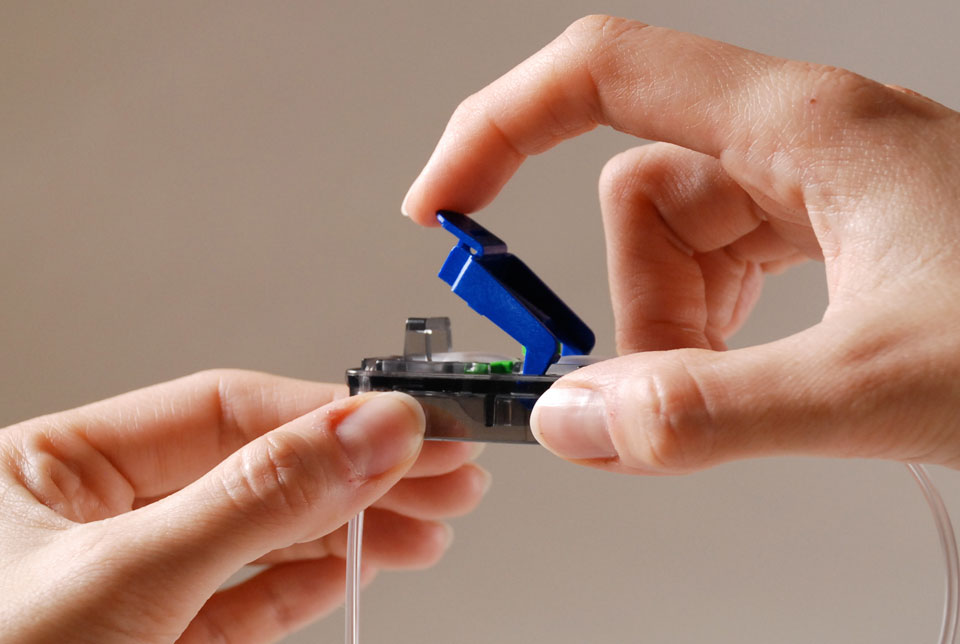
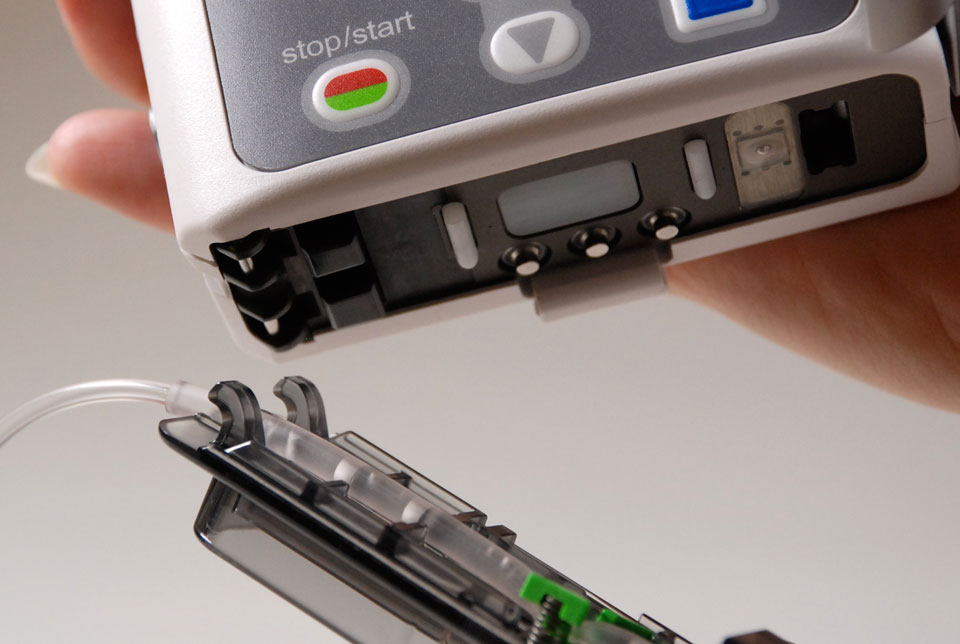
Insert the cassette hooks into the hinge pins on the pump
Click Next Page to continue.
6-03_07
Operations
Attach Cassette
Swing the cassette into the latch position
Click Next Page to continue.
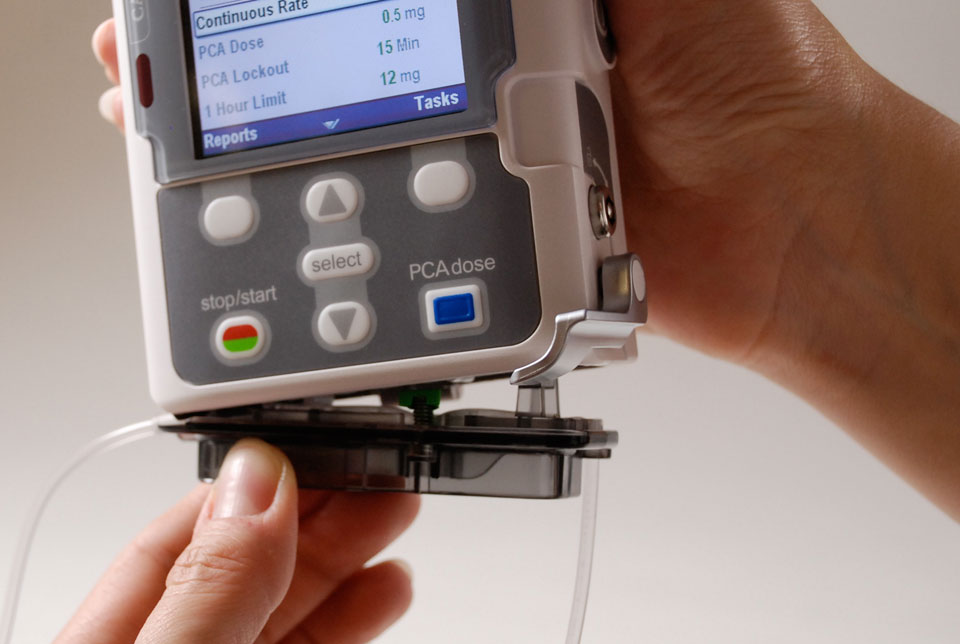
6-03_08
Operations
Attach Cassette
Place the pump upright on a firm, flat surface
Click Next Page to continue.
6-03_09
Operations
Attach Cassette
Press down on the latch side of the pump so the cassette fits tightly against the pump
Click Next Page to continue.
6-03_10
Operations
Attach Cassette
Lift the cassette latch handle into the closed position
If you experience resistance when lifting the handle, do not force the latch
If it does not latch easily, unlatch the cassette and repeat the process
Click Next Page to continue.
6-03_11
Operations
Attach Cassette
Verify the cassette is attached correctly
Look left to right – the top of the cassette should line up evenly with the bottom of the pump and be securely attached
Click Next Page to continue.
6-03_12
Operations
Attach Cassette
If an uneven gap exists, unlatch the cassette and repeat the process
Click Next Page to continue.
6-03_13
Operations
Attach Cassette
When the cassette is properly attached, a message will briefly appear in the status bar to confirm attachment
Click Next Page to continue.
6-03_14
Operations
Attach Cassette
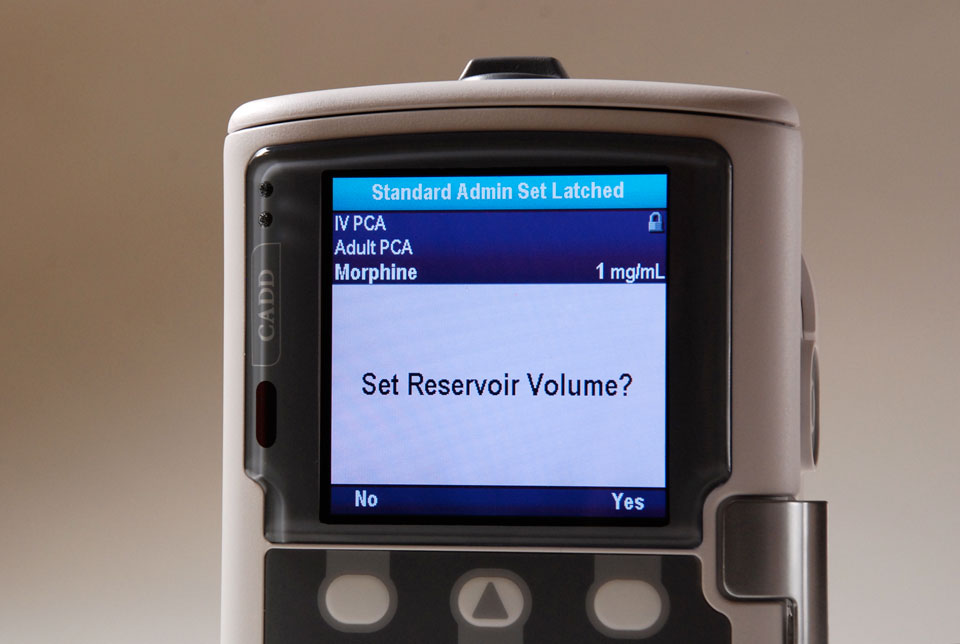
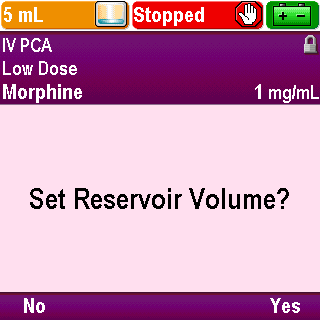
The “Set Reservoir Volume?” screen may appear. Press Yes or No as appropriate
Click Next Page to continue.
6-03_15
Operations
Attach Cassette
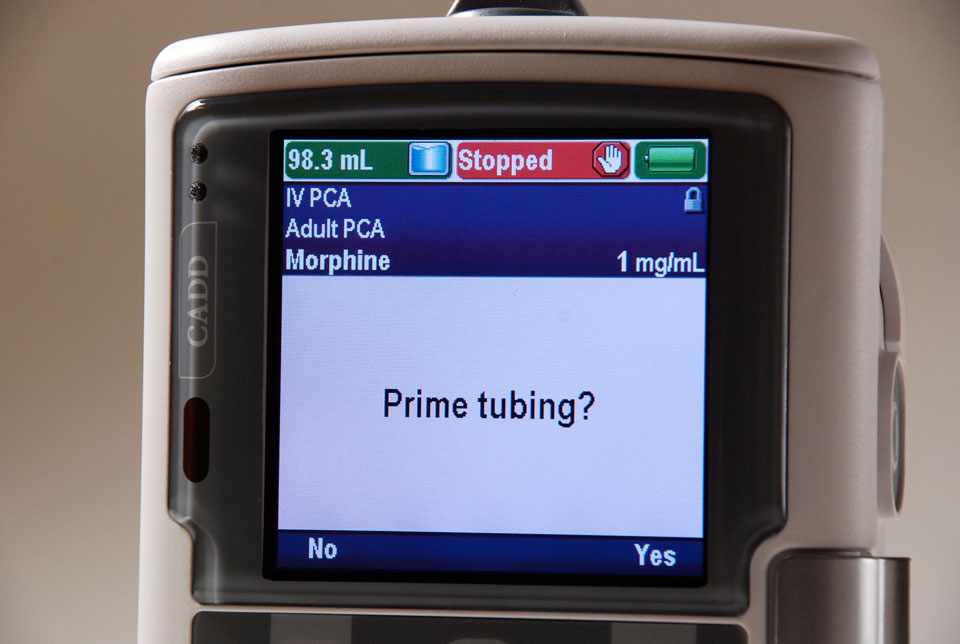
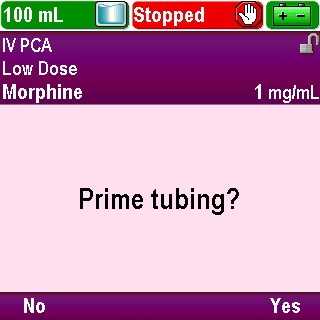
Next, the “Prime tubing?” screen appears. Press Yes or No as appropriate
Click Next Page to continue.
6-03_16
Operations
Attach Cassette
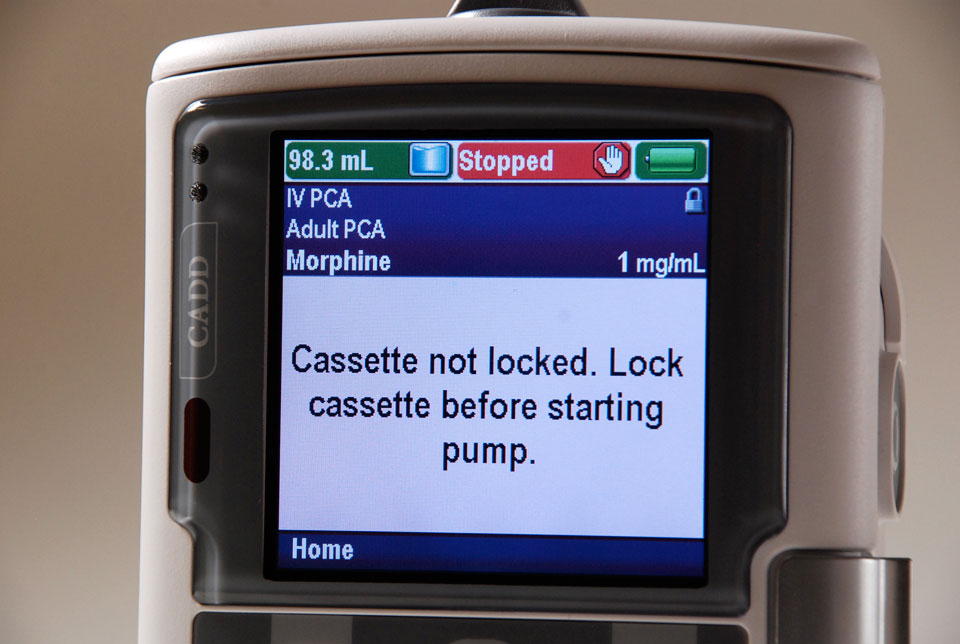
Finally the “Cassette not locked. Lock cassette before starting pump.” screen may appear
Click Next Page to continue.
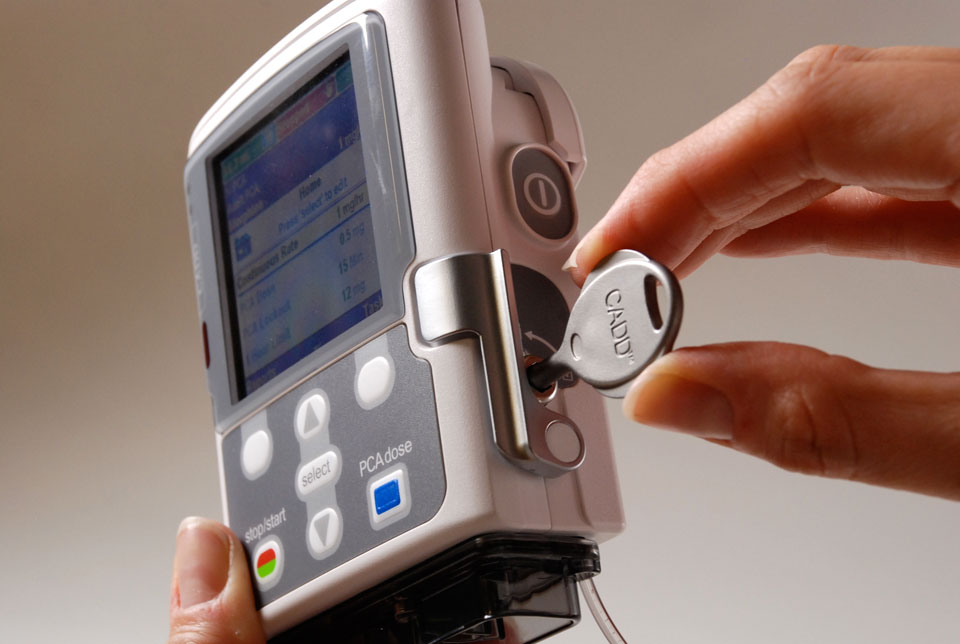
6-03_17
Operations
Attach Cassette
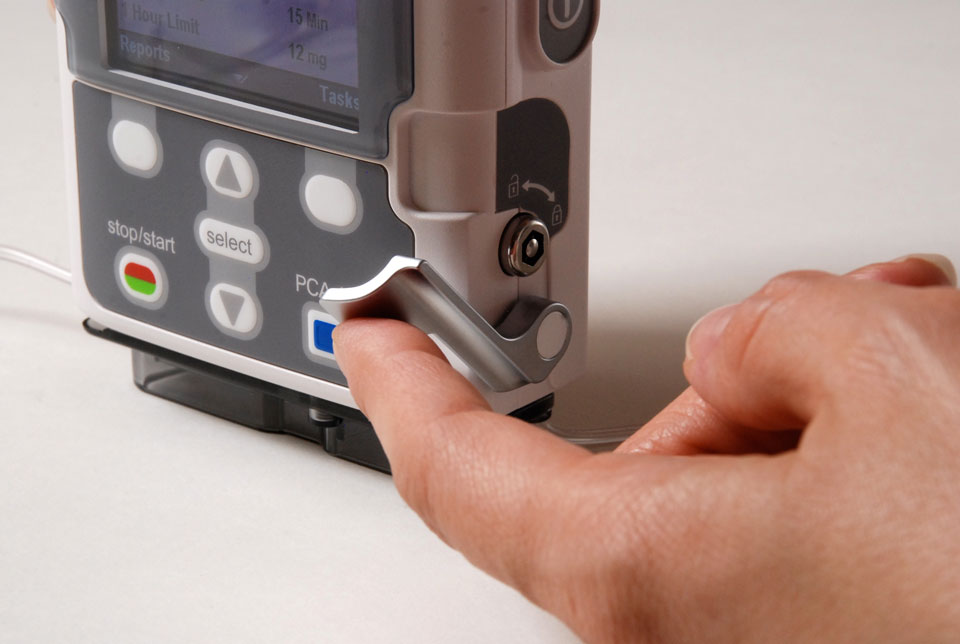
Insert the pump key into the cassette/keypad lock and turn clockwise into the locked position
The cassette must be locked in order to start the pump
Click Next Page to continue.
6-03_18
Operations

Prime Tubing
Always prime the fluid path to remove any air before connecting the CADD®-Solis pump to the patient
Do not prime with the tubing attached to the patient. This could result in over delivery of medication or air embolism
To prime the tubing, you will need a security code or the pump key if the keypad is locked
With the pump powered on, attach a CADD™ Medication Cassette Reservoir or CADD® Administration Set to the pump
The “Prime tubing?” screen will appear
Press Yes to prime the tubing
Click Next Page to continue.
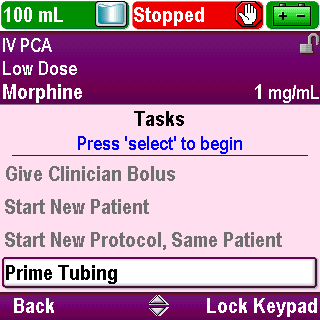
6-04_01
Operations
Prime Tubing
Or go to the Tasks menu by pressing Tasks on the Home screen
Click Next Page to continue.
6-04_02
Operations

Prime Tubing
Use the arrow keys to scroll up or down and highlight the “Prime Tubing” task
Click Next Page to continue.
6-04_02-01
Operations

Prime Tubing
Press Select
Click Next Page to continue.
6-04_02-02
Operations
Prime Tubing
Enter the security code or use the pump key to unlock the keypad, if prompted, as outlined in the Overview section of this training
Click Next Page to continue.
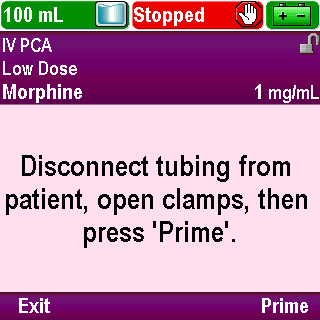
6-04_03
Operations
Prime Tubing
The screen will display “Disconnect tubing from patient, open clamps, then press ‘Prime’.”
When ready, press Prime
Click Next Page to continue.
6-04_04
Operations
Prime Tubing
Or press Exit to perform this task later
Click Next Page to continue.
6-04_04-01
Operations
Prime Tubing
The pump will begin priming. The screen will display the amount of fluid being primed
Click Next Page to continue.
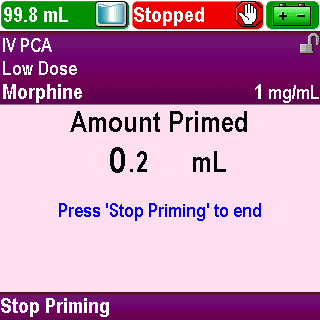
6-04_05
Operations

Prime Tubing
You may press Stop Priming at any time to stop priming
If Stop Priming is not pressed, priming will automatically stop once the pump has primed 10 mL with standard sets or 20 mL with high volume sets
Click Next Page to continue.
6-04_06
Operations
Prime Tubing
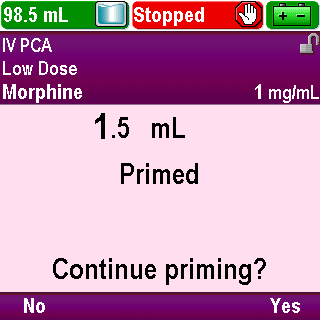
When Stop Priming is pressed, you may choose :
Yes to continue priming or
No to confirm that you want to stop priming
Before connecting to a patient, confirm that the entire fluid path is free of air
If using tubing with an air-eliminating filter, the presence of air on the vent side of the filter is acceptable
Click Next Page to continue.
6-04_06-01
Operations
Prime Tubing
Play
Click Next Page to continue.
6-04_07
Operations
Remove Cassette
To remove a cassette follow these steps:
Close the tubing clamp
Click Next Page to continue.
6-05_01
Operations
Remove Cassette
If the cassette latch is locked, insert the pump key into the cassette/keypad lock and turn counter-clockwise into the unlocked position
Click Next Page to continue.
6-05_02
Operations
Remove Cassette
Pull down on the cassette latch handle until the cassette detaches
Click Next Page to continue.
6-05_03
Operations
Change the Reservoir
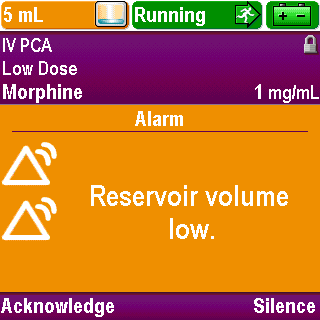
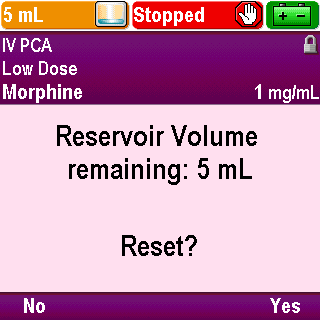
To correct a low reservoir condition, a new reservoir needs to be attached and the reservoir volume needs to be reset to match the volume in the new reservoir
Click Next Page to continue.
6-06_01
Operations
Change the Reservoir
Stop the pump by pressing the Stop/Start key
Click Next Page to continue.
6-06_01-01
Operations
Change the Reservoir
When “Stop Pump?” appears, press Yes
Click Next Page to continue.
6-06_01-02
Operations
Change the Reservoir
A message appears indicating the pump is stopping
Click Next Page to continue.
6-06_01-03
Operations
Change the Reservoir
Remove the CADD™ Medication Cassette Reservoir or the CADD® Administration Set if a tubing change needs to be done. This will require a pump key to unlock the latch handle
Click Next Page to continue.
6-06_02
Operations
Change the Reservoir
Attach a new CADD™ Medication Cassette Reservoir or new CADD® Administration Set with a new IV bag to the pump
Click Next Page to continue.
6-06_03
Operations
Change the Reservoir
Use the pump key to relock the latch handle
Click Next Page to continue.
6-06_04
Operations
Change the Reservoir
The screen will display prompts to perform various tasks
First it prompts to reset the reservoir volume,
Press Yes
Click Next Page to continue.
6-06_05
Operations
Change the Reservoir
Confirm the reservoir volume reset
by pressing Yes
Click Next Page to continue.
6-06_05-01
Operations
Change the Reservoir
Enter the security code as outlined in the Overview section of this training
Click Next Page to continue.
6-06_05-01-01
Operations


Change the Reservoir
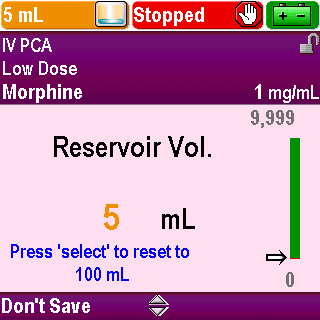
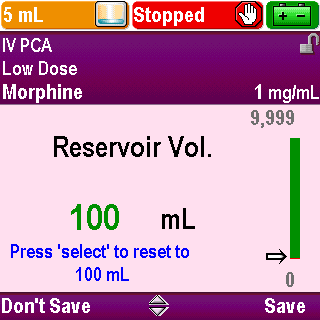
Scroll to the desired value or press Select to reset to the value displayed in blue
Click Next Page to continue.
6-06_05-01-02
Operations
Change the Reservoir
Press Save
Click Next Page to continue.
6-06_05-01-03
Operations
Change the Reservoir
Next the pump will prompt to prime the tubing. Press Yes or No as appropriate
Click Next Page to continue.
6-06_05-02
Operations

Change the Reservoir
Review the settings and accept the values since the reservoir volume value was reset
Click Next Page to continue.
6-06_05-03
Operations
Change the Reservoir
Acknowledge any clinical advisory note that may be entered for the selected protocol
Click Next Page to continue.
6-06_05-04
Operations
Change the Reservoir
Finally the pump will prompt to start the pump. Press Yes or No as appropriate
Follow the prompts on the pump screen as appropriate to complete all the tasks and restart the pump
Note: Review/accept settings and acknowledge the clinical advisory note as outlined in the Pump Programming sections of this training
Note: Prime tubing and start the pump as outlined in this Operations section of the training
Click Next Page to continue.
6-06_05-05
Operations
Change the Reservoir
If you only need to change the IV bag on the CADD® Administration Set and not the set itself, follow these steps:
Stop the pump by pressing the Stop/Start key
Click Next Page to continue.
6-06_06
Operations
Change the Reservoir
When “Stop Pump?” appears, press Yes
Click Next Page to continue.
6-06_06-01
Operations
Change the Reservoir
A message appears indicating the pump is stopping
Click Next Page to continue.
6-06_06-02
Operations
Change the Reservoir
Remove the old IV bag from the tubing and attach a new IV bag
Click Next Page to continue.
6-06_07
Operations
Change the Reservoir
On the “Home” screen, scroll to highlight ”Reservoir Volume”, press Select
Click Next Page to continue.
6-06_08
Operations
Change the Reservoir
Enter the security code, as outlined in the Overview section of this training
Click Next Page to continue.
6-06_09
Operations
Change the Reservoir
Scroll to the desired value or press Select to reset to the value displayed in blue
Click Next Page to continue.
6-06_10
Operations
Change the Reservoir
Press Save
Click Next Page to continue.
6-06_11
Operations
Change the Reservoir
Press Stop/Start to restart the pump
Click Next Page to continue.
6-06_12
Operations
Change the Reservoir
You will be prompted to review the settings and accept the values since the reservoir volume value was reset
Click Next Page to continue.
6-06_13
Operations
Change the Reservoir
Once the values have been accepted, acknowledge any clinical advisory note that may be entered for the selected protocol
Note: Review/accept settings and acknowledge the clinical advisory note as outlined in the Pump Programming sections of this training
Click Next Page to continue.
6-06_13-01
Operations
Change the Reservoir
Press Yes to the prompt “Start pump?”
Click Next Page to continue.
6-06_14
Operations
Change the Reservoir
If it is necessary to prime the tubing after a bag change and before restarting the pump:
From the “Home” screen press Tasks
Click Next Page to continue.
6-06_15
Operations
Change the Reservoir
Scroll down to highlight “Prime Tubing”, press Select
Prime tubing as outlined earlier in this Operations section of the training.
(Note: if keypad is locked, enter security code when prompted)
Click Next Page to continue.
6-06_16
Operations
Change the Reservoir
Press the Stop/Start key to restart the pump
Click Next Page to continue.
6-06_17
Operations
Install Batteries
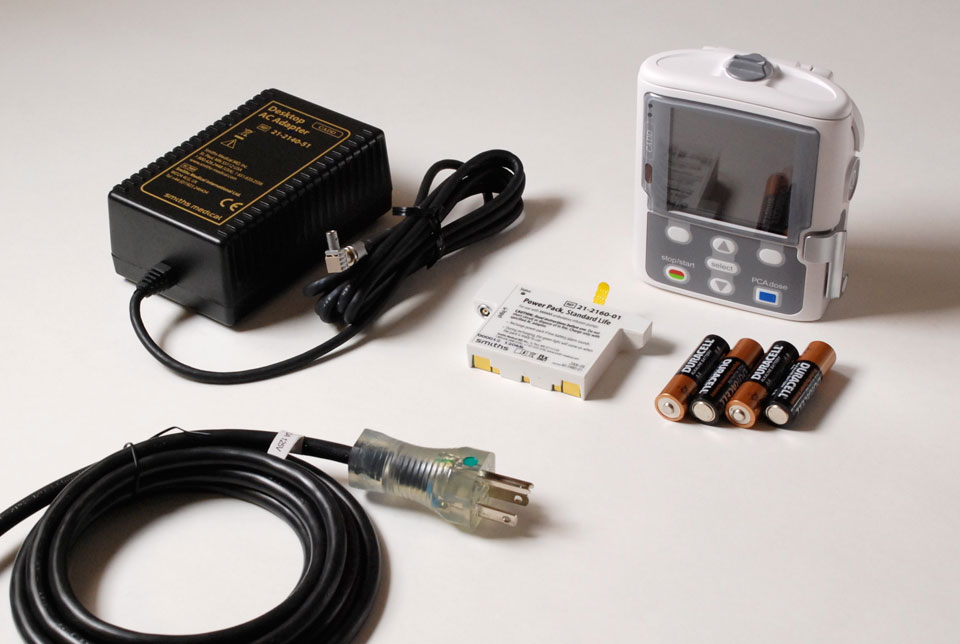
The CADD®-Solis pump operates on four 1.5-volt AA alkaline batteries, a rechargeable battery pack, or an AC adapter. When the pump is connected to the AC adapter, batteries must be installed to provide backup power
Click Next Page to continue.
6-07_01
Operations

Install Batteries
To install AA batteries:
Confirm the pump is stopped or powered off
Use your fingers, the pump key or a coin to turn the knob on the battery compartment door at the top of the pump
If the battery door is damaged, do not use the pump as power loss and non-delivery of the drug may result
Use only new alkaline batteries (or the rechargeable battery pack)
Other types of batteries, such as NiCad or nickel metal hydride batteries do not provide sufficient power for the pump to operate properly
Click Next Page to continue.
6-07_02
Operations

Install Batteries
Check the battery compartment for fluid or debris. These may damage the battery contacts and could result in loss of power and non-delivery of the drug
Click Next Page to continue.
6-07_03
Operations
Install Batteries
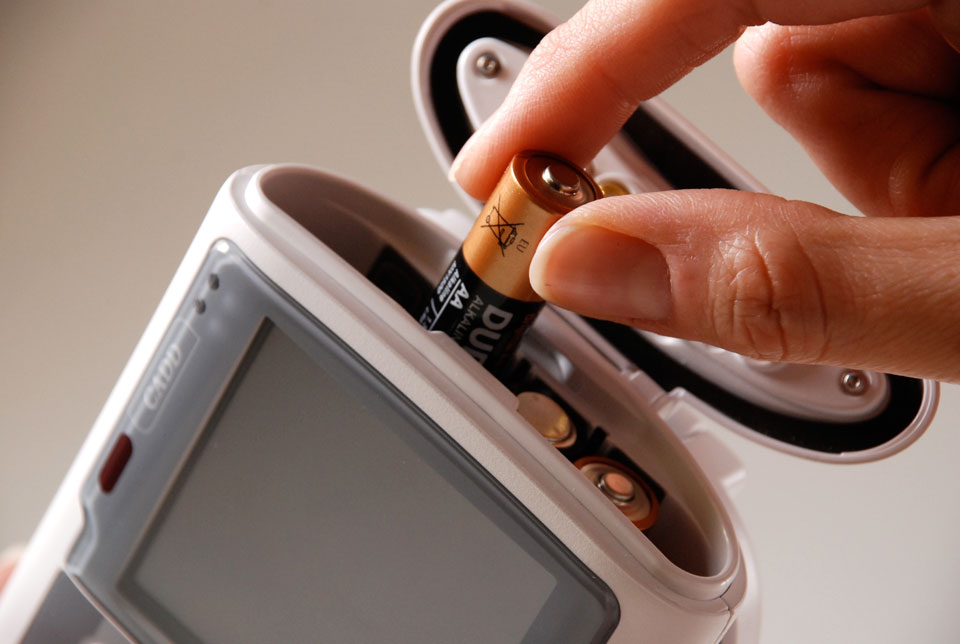
Hold the pump at an angle and insert the four AA batteries into the pump
Match the positive and negative markings on the new batteries with the indications on the pump
Click Next Page to continue.
6-07_04
Operations

Install Batteries
Close the battery door
Note: if you have not properly inserted the batteries, the pump will not power up. Check the batteries, making certain to match the positive and negative markings
Click Next Page to continue.
6-07_05
Operations

Install Batteries
To turn on the pump, press and hold the power switch
The pump will begin its power up sequence. During this sequence, the pump will perform self-tests and test for alarm conditions
Click Next Page to continue.
6-07_06
Operations
Install Batteries
When fully powered up, the pump will ask if you want to start a new patient
Press Yes or No as appropriate
Click Next Page to continue.
6-07_07
Operations

Alternate Power Sources
Two alternate power sources for the CADD®-Solis pump are the rechargeable battery pack and an AC adapter
To install the rechargeable battery pack:
Confirm the pump is stopped or powered off
Click Next Page to continue.
6-08_01
Operations

Alternate Power Sources
Use your fingers, the pump key or a coin to turn the knob on the battery compartment door at the top of the pump
If the battery door is damaged, do not use the pump as a loss of power and non-delivery of the drug may result
Click Next Page to continue.
6-08_02
Operations

Alternate Power Sources
Check the battery compartment for fluid or debris. These may damage the battery contacts and could result in loss of power and non-delivery of the drug
Click Next Page to continue.
6-08_03
Operations
Alternate Power Sources
Insert the battery pack into the pump with the flat side toward the pump’s screen
Click Next Page to continue.
6-08_04
Operations

Alternate Power Sources
Close the battery door
Click Next Page to continue.
6-08_05
Operations

Alternate Power Sources
To turn on the pump, press and hold the power switch
The pump will begin its power up sequence. During this sequence, the pump will perform self-tests and test for alarm conditions
Click Next Page to continue.
6-08_06
Operations

Alternate Power Sources
When fully powered up, the pump will ask if you want to start a new patient
Press Yes or No as appropriate
Click Next Page to continue.
6-08_07
Operations


Alternate Power Sources
The rechargeable battery pack can be recharged while inside or outside the pump
Plug the AC adapter into the pump to charge the battery pack while inside the pump
Plug the AC adapter into the jack on the battery pack if outside the pump
Click Next Page to continue.
6-08_08
Operations
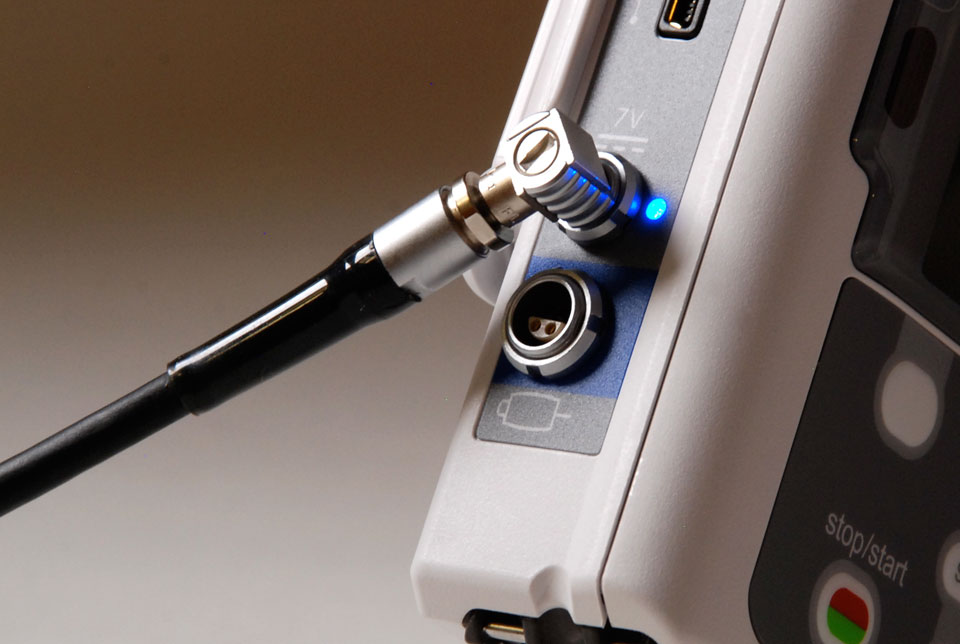
Alternate Power Sources
To use the AC adapter with the CADD®-Solis pump, first install either four AA alkaline batteries or the rechargeable battery pack
The batteries provide power backup for the AC adapter
The pump will not operate without fresh alkaline batteries or a charged battery pack even if the AC adapter is being used
Plug the AC adapter into the AC power jack on the left facing side of the pump
Click Next Page to continue.
6-08_09
Operations
Alternate Power Sources
When you connect the AC adapter to the pump, a small blue indicator light next to the jack will illuminate to indicate the power connection
The light will illuminate whether the pump is on or off
Click Next Page to continue.
6-08_10
Operations

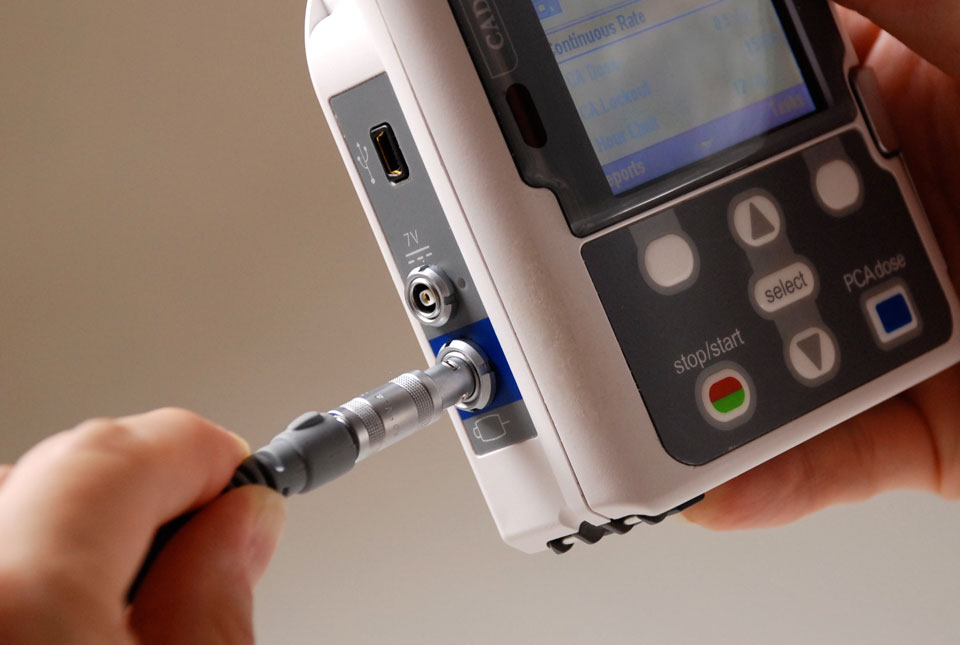
Remote Dose Cord
The remote dose cord provides the patient with an alternative to pushing the PCA/PCEA dose button located on the pump keypad when requesting a PCA/PCEA dose
Attach the remote dose cord to the pump by plugging the cord into the remote dose cord jack
The jack is located below the AC adapter jack on the left facing side of the pump
Do not twist or turn the remote dose cord while inserting it into or removing it from the jack on the pump. Doing so could damage the connector pins
Click Next Page to continue.
6-09_01
Operations
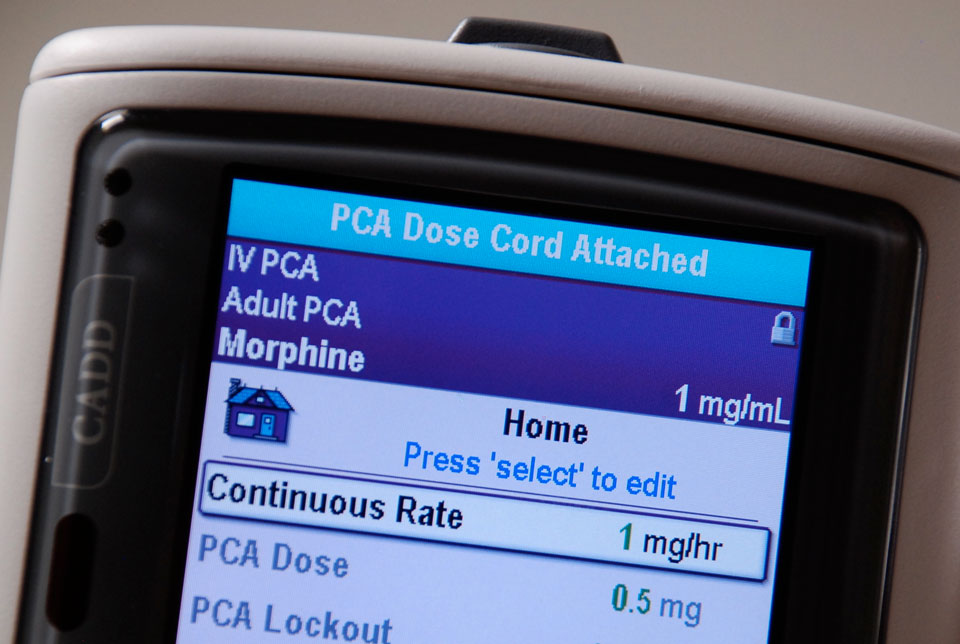
Remote Dose Cord
A message briefly appears in the status bar to acknowledge that the PCA/PCEA dose cord is attached
Click Next Page to continue.
6-09_02
Operations

Remote Dose Cord
The LED on the remote dose cord indicates PCA/PCEA dose status:
Off: A PCA/PCEA dose is not available
Flashing: A PCA/PCEA dose is available
On: A PCA/PCEA dose has been requested and delivery has started
Click Next Page to continue.
6-09_03
Operations
Review
When the pump is powered on before a cassette or administration set is attached, the pump will provide you with prompts to verify the cassette type, reset the reservoir volume if necessary, and prime the fluid path.
True or False?
Click Next Page to continue.
6-10_01
Operations
Review
True:
When the pump is powered on before a cassette/administration set is attached, the pump will provide you with prompts to verify the cassette type, reset the reservoir volume if necessary, and prime the fluid path. If a cassette/administration set is attached before the pump is powered on, the pump does not provide these prompts.
Click Next Page to continue.
6-10_02
Operations
Review
You can prime the tubing using the “Prime Tubing” task in the Task menu.
True or False?
Click Next Page to continue.
6-10_03
Operations
Review
True:
You can prime the tubing using the “Prime Tubing” task in the Task menu.
Click Next Page to continue.
6-10_04
Operations
Review
The pump will automatically prompt you to reset the reservoir volume when an IV bag reservoir is changed without changing the administration set.
True or False?
Click Next Page to continue.
6-10_05
Operations
Review
False:
When changing an IV bag reservoir without changing the administration set, the prompt to reset the reservoir volume will not appear since the administration set remains attached to the pump during the bag change. To reset the reservoir volume before restarting the pump, highlight the “Reservoir Vol” parameter on the “Home” screen and press Select, enter the security code and reset the value.
Click Next Page to continue.
6-10_06
Tasks
Introduction
Click Next Page to continue.
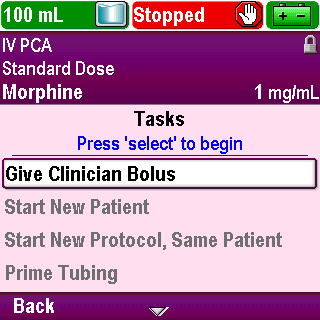
7-01_00
Tasks
Give Clinician Bolus
This task is covered in the Additional Functions portion of this training program
Click Next Page to continue.
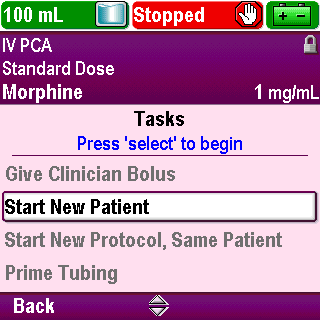
7-02_01
Tasks
Start New Patient
This task is covered in the Pump Programming portion of this training program
Click Next Page to continue.
7-03_01
Tasks
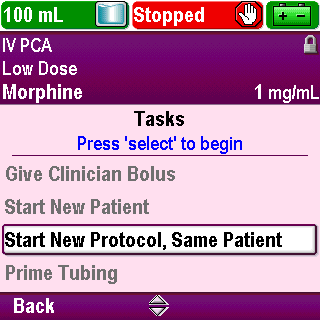
Start New Protocol, Same Patient
This task allows you to select a new protocol for the current patient, such as when there has been a change in the drug ordered
It is the same as the Start New Patient task except that using this task does not insert a new patient marker in the event log and it does not clear the delivery log
This task would be used according to your facility’s policies and procedures
Click Next Page to continue.
7-04_01
Tasks
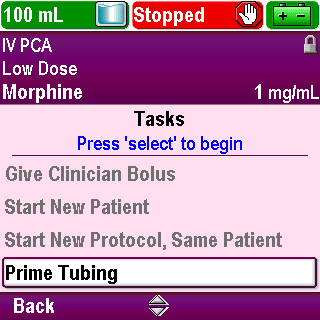
Prime Tubing
- This task is covered in the Operations section of this training program
Click Next Page to continue.
7-05_01
Tasks
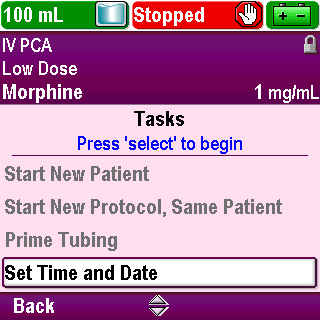
Set Time and Date
The pump does not automatically update for daylight saving time. If you live in a geographical area that follows daylight saving time, you must manually update the time
You may choose to change the time while the pump is currently being used by a patient or wait until the patient is finished with therapy
Protocol information, such as dose lockout times, remain the same regardless of changing the time and/or date during a patient’s therapy
The current time and date can be adjusted using the keypad or clinician code
Adjusting the time format or date format requires an administrator code
Use the arrow keys to scroll to highlight “Set Time and Date”
Press Select
Click Next Page to continue.
7-06_01
Tasks
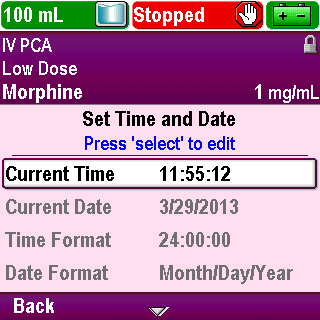
Set Time and Date
Use the arrow keys to scroll and highlight “Current Time” or “Current Date”
Press Select
Note the blue text providing a prompt
Click Next Page to continue.
7-06_02
Tasks

Set Time and Date
Enter the security code as outlined in the Overview section of this training
Click Next Page to continue.
7-06_02-01
Tasks
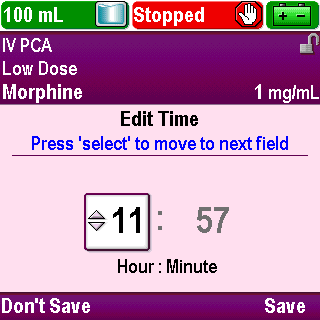
Set Time and Date
Use the arrow keys to scroll in the first field for the desired time (or date)
Click Next Page to continue.
7-06_03
Tasks
Set Time and Date
Press Select to move to the next field (note the help text in blue font)
Click Next Page to continue.
7-06_04
Tasks
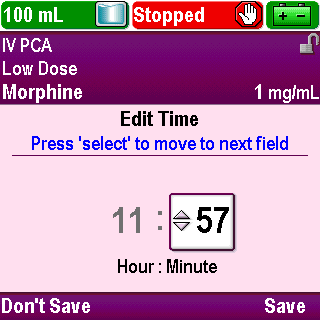
Set Time and Date
When all fields on the screen have the correct value, press Save to save the time (or date)
Click Next Page to continue.
7-06_05
Tasks
Set Time and Date
Press Don’t Save to return to the Set Time and Date screen with no change
Click Next Page to continue.
7-06_05-01
Tasks

Set Time and Date
Press Back to return to the Tasks menu
Click Next Page to continue.
7-06_05-02
Tasks
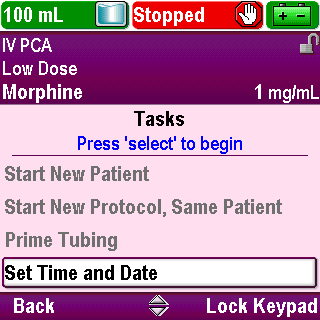
Set Time and Date
Press Lock Keypad to relock the keypad after completing the task
Click Next Page to continue.
7-06_05-03
Tasks

Adjust Backlight Intensity
Use the arrow keys to scroll to highlight “Adjust Backlight Intensity”
Press Select
Click Next Page to continue.
7-07_01
Tasks
Adjust Backlight Intensity
Enter the security code as outlined in the Overview section of this training
Click Next Page to continue.
7-07_01-01
Tasks
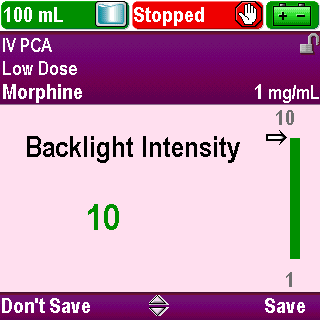
Adjust Backlight Intensity
The brightness of the screen can be adjusted as necessary to allow for better viewing by the user
The backlight can be adjusted within a range of 1 – 10 with 10 being the brightest
Increasing the backlight intensity shortens the battery life
Use the arrow keys to scroll to the desired intensity
Click Next Page to continue.
7-07_02
Tasks
Adjust Backlight Intensity
Press Save to save the highlighted choice or press Don’t Save to return to the Tasks menu with no change
Click Next Page to continue.
7-07_03
Tasks
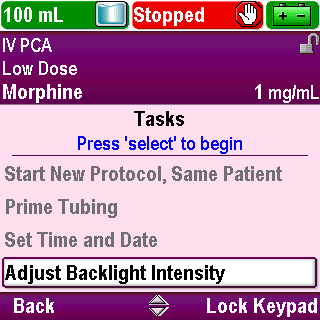
Adjust Backlight Intensity
Press Lock Keypad to relock the keypad after completing the task
Click Next Page to continue.
7-07_03-01
Tasks
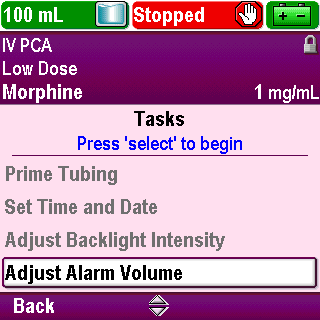
Adjust Alarm Volume
Use the arrow keys to scroll to highlight “Adjust Alarm Volume”
Press Select
Click Next Page to continue.
7-08_01
Tasks
Adjust Alarm Volume
Enter the security code as outlined in the Overview section of this training
Click Next Page to continue.
7-08_01-01
Tasks
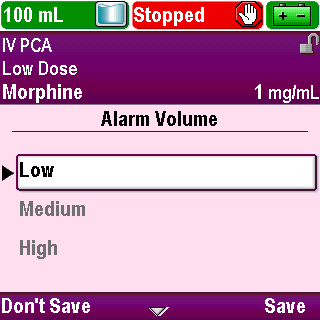
Adjust Alarm Volume
There are three options for alarm volume: low, medium, and high
It can be adjusted, as necessary, to fit the environment
Note: If a high or medium priority alarm exists for two or more minutes without being acknowledged, the alarm volume will automatically adjust to “High”
Use the arrow keys to scroll to the desired volume
Click Next Page to continue.
7-08_02
Tasks
Adjust Alarm Volume
Press Save to save the highlighted choice or press Don’t Save to return to the Tasks menu with no change
Click Next Page to continue.
7-08_03
Tasks
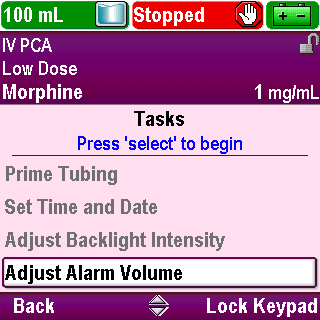
Adjust Alarm Volume
Press Lock Keypad to relock the keypad after completing the task
Click Next Page to continue.
7-08_03-01
Tasks
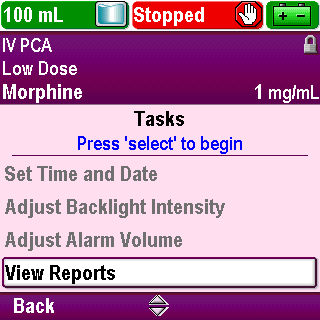
View Reports
Use the arrow keys to scroll to highlight “View Reports”
Press Select
Click Next Page to continue.
7-09_01
Tasks
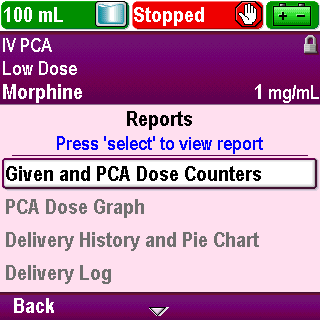
View Reports
Selecting this task will take you to the “Reports” menu
Click Next Page to continue.
7-09_01-01
Tasks
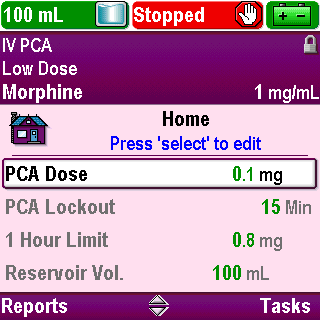
View Reports
This can also be reached by pressing Reports on the “Home” screen.
More information on individual reports can be found in the Reports section of this training program
Click Next Page to continue.
7-09_01-02
Tasks
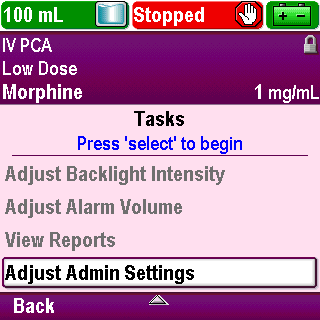
Adjust Admin Settings
The administrator settings contain pump configurations that are set up by the CADD®-Solis system Administrator
Access to the “Admin Settings” task menu requires the administrator code
Contact your CADD®-Solis system Administrator if you have any questions about the “Admin Settings” menu
Click Next Page to continue.
7-10_01
Tasks
Review
The pump automatically updates the time for daylight saving time.
True or False?
Click Next Page to continue.
7-11_01
Tasks
Review
False:
The pump does not automatically update for daylight saving time. If you live in a geographical area that follows daylight saving time, you must manually update the time.
Click Next Page to continue.
7-11_02
Tasks
Review
If a high or medium priority alarm exists for two or more minutes without being acknowledged, the alarm volume will automatically adjust to “High”.
True or False?
Click Next Page to continue.
7-11_03
Tasks
Review
True:
If a high or medium priority alarm exists for two or more minutes without being acknowledged, the alarm volume will automatically adjust to “High”.
Click Next Page to continue.
7-11_04
Reports
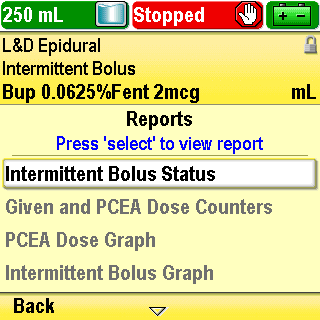
Introduction
Click Next Page to continue.
8-01_00
Reports
Introduction
From the Home screen, press Reports
Click Next Page to continue.
8-01_01
Reports
Intermittent Bolus Status
This report displays the amount of time that has elapsed since the beginning of the last intermittent bolus, and the amount of time until the next intermittent bolus is due to be delivered
This report will only be available when an Intermittent Bolus protocol has been selected
Click Next Page to continue.
8-02_01
Reports

Given and PCA/PCEA Dose Counters
This report displays the number of PCA/PCEA doses given and attempted since the date and time indicated, which is the last time they were cleared manually or when a new protocol or new patient was started
“Given” is the amount and volume of drug given in continuous rate, clinician boluses, intermittent boluses, and PCA/PCEA doses
Click Next Page to continue.
8-03_01
Reports
Given and PCA/PCEA Dose Counters
To clear this report, highlight “Given” and press Clear Given
Click Next Page to continue.
8-03_02
Reports

Given and PCA/PCEA Dose Counters
“PCA/PCEA Doses Given” displays the number of PCA/PCEA doses actually delivered to the patient, including any doses stopped in progress
“PCA/PCEA Doses Attempted” displays the total number of PCA/PCEA doses attempted by the patient while the pump was running, including those that were delivered, locked out, and stopped in progress
Click Next Page to continue.
8-03_03
Reports
Given and PCA/PCEA Dose Counters
To clear this report, use the arrow key to scroll down and highlight “PCA/PCEA Doses Given/Attempted” and press Clear Doses
Click Next Page to continue.
8-03_04
Reports
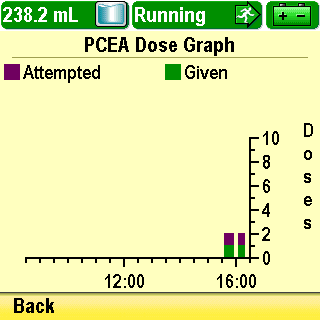
PCA/PCEA Dose Graph
This report displays the number of doses given and attempted in 30 minute increments from the current time back to the start of a new protocol or patient, up to a maximum of 8 hours
The “PCA/PCEA Dose Graph” report is automatically cleared when a new protocol or new patient is started
Click Next Page to continue.
8-04_01
Reports
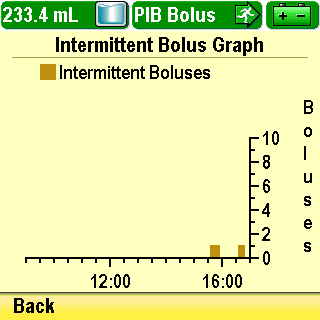
Intermittent Bolus Graph
This report displays the number of intermittent boluses given in 30 minute increments from the current time back to the start of a new protocol or patient, up to a maximum of 8 hours
The “Intermittent Bolus Graph” report is automatically cleared when a new protocol or new patient is started
This report will only be available when an Intermittent Bolus protocol has been selected
Click Next Page to continue.
8-05_01
Reports
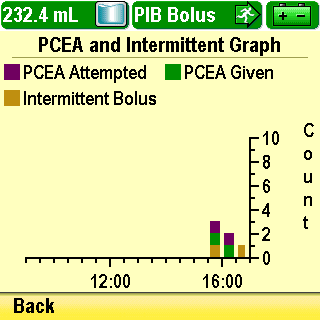
PCA/PCEA and Intermittent Graph
This report displays the number of intermittent boluses, and the number of PCA/PCEA doses attempted and given in 30 minute increments from the current time back to the start of a new protocol or patient, up to a maximum of 8 hours
The “PCA/PCEA and Intermittent Graph” report is automatically cleared when a new protocol or new patient is started
This report will only be available when an Intermittent Bolus protocol has been selected
Click Next Page to continue.
8-06_01
Reports
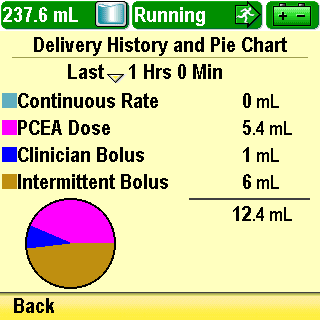
Delivery History and Pie Chart
This report displays the proportion of therapy delivered by the continuous rate, intermittent bolus, PCA/PCEA doses and clinician bolus
If the pump has been running using the current protocol for more than 30 minutes, use the arrow keys to scroll back to review the history in 30-minute increments
This report displays up to seven days of data. It is automatically cleared when a new protocol is started
Click Next Page to continue.
8-07_01
Reports

Delivery Log
This report is a subset of the “Event Log” and contains information specific to delivery events. Each event is date and time-stamped
Use the arrow keys to scroll through the events
This report clears each time a new patient is started
Click Next Page to continue.
8-08_01
Reports
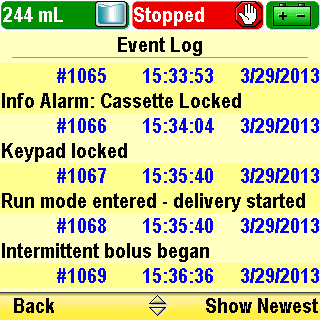
Event Log
This report records every event or action that occurs with the pump. Each event is date and time-stamped. This report stores 5,000 events
Use the arrow keys to scroll through the events
This report is not cleared when a new protocol or new patient is started. Once 5,000 events have been recorded, the oldest one drops off the log when a new one is added
Click Next Page to continue.
8-09_01
Reports
Protocol Library Summary
This report displays the name of the current library installed on the pump, the revision number and the number of protocols in the library
Click Next Page to continue.
8-10_01
Reports
Device Information
This report displays the pump serial number, software number and other information about the pump
Click Next Page to continue.
8-11_01
Alarms
Review
The “Given and PCA/PCEA Dose Counters” report displays the number of PCA/PCEA doses given and attempted since the date and time indicated, which is the last time they were cleared manually or when a new protocol or new patient was started. It also displays “Given” which is the amount and volume of drug given in continuous rate, clinician boluses, intermittent boluses, and PCA/PCEA doses.
True or False?
Click Next Page to continue.
8-12_01
Alarms
Review
True:
The “Given and PCA/PCEA Dose Counters” report displays the number of PCA/PCEA doses given and attempted since the date and time indicated, which is the last time they were cleared manually or when a new protocol or new patient was started. It also displays “Given” which is the amount and volume of drug given in continuous rate, clinician boluses, intermittent boluses, and PCA/PCEA doses.
Click Next Page to continue.
8-12_02
Alarms
Review
The “Delivery Log” report is a subset of the “Event Log” and contains information specific to delivery events. Each event is date and time-stamped. This report never clears.
True or False?
Click Next Page to continue.
8-12_03
Alarms
Review
False:
The “Delivery Log” report is a subset of the “Event Log” and contains information specific to delivery events. Each event is date and time-stamped. This report clears each time a new patient is started.
Click Next Page to continue.
8-12_04
Alarms
Review
The “Event Log” report records every event or action that occurs with the pump. Each event is date and time-stamped. This report stores 5,000 events. This report is not cleared when a new protocol or new patient is started. Once 5,000 events have been recorded, the oldest one drops off the log when a new one is added.
True or False?
Click Next Page to continue.
8-12_05
Alarms
Review
True:
The “Event Log” report records every event or action that occurs with the pump. Each event is date and time-stamped. This report stores 5,000 events. This report is not cleared when a new protocol or new patient is started. Once 5,000 events have been recorded, the oldest one drops off the log when a new one is added.
Click Next Page to continue.
8-12_06
Alarms
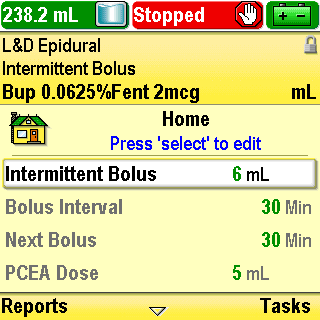
Introduction
Click Next Page to continue.
9-01_00
Alarms
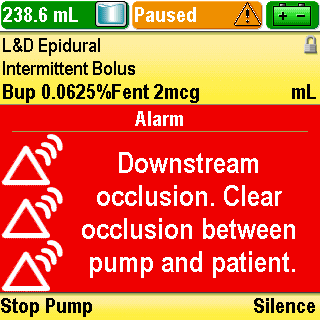
Types of Alarms
High Priority Alarm
A high-priority alarm is accompanied by a red screen
If the pump is running, it will stop when a high-priority alarm activates
The alarm will continue until you press a key on the pump or correct the condition that triggered the alarm
Press Stop Pump to clear the alarm
Click Next Page to continue.
9-02_01
Alarms
Types of Alarms
Press Silence to silence the alarm
If the problem condition is not corrected, the alarm will sound again after two minutes
Click Next Page to continue.
9-02_02
Alarms
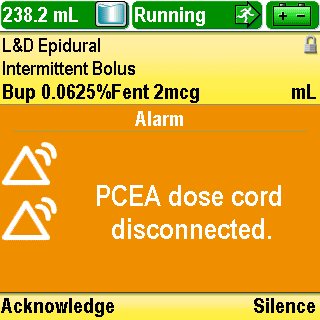
Types of Alarms
Medium Priority Alarm
A medium-priority alarm is accompanied by an amber screen
If the pump is running when a medium-priority alarm sounds, it will continue to run
The alarm will continue until you press a key on the pump or correct the problem that triggered the alarm
Press Acknowledge to clear the alarm
Click Next Page to continue.
9-02_03
Alarms
Types of Alarms
Press Silence to silence the alarm
If the problem is not corrected, the alarm will sound again after two minutes
Click Next Page to continue.
9-02_04
Alarms
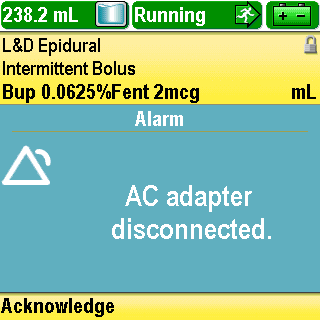
Types of Alarms
Low Priority Alarm
A low-priority alarm is accompanied by a blue screen
If the pump is running, it will continue to run
The alarm will continue for five seconds, unless you acknowledge it by pressing Acknowledge, or correct the problem before the five seconds have passed
Click Next Page to continue.
9-02_05
Alarms
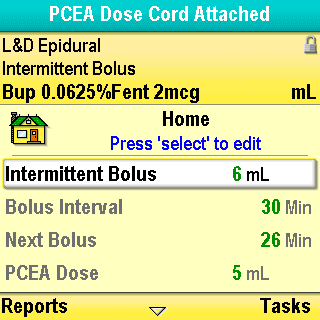
Types of Alarms
Informational Alarm
An informational alarm will appear in the status bar
If the pump is running, it will continue to run
The alarm is generally silent and will persist for five seconds in the status bar
Click Next Page to continue.
9-02_06
Alarms

Types of Alarms
System Fault
If a system fault message appears, an unrecoverable error may have occurred
The amber indicator light will be continuously illuminated which will be accompanied by an audible two-tone alarm
To clear this alarm, you must remove power from the pump by opening the battery door and, if necessary, removing AC power
Turn the pump back on
If the pump passes the power-up tests, follow your facility’s policies to confirm that the current protocol library is on the pump. The pump can then be reprogrammed for use
If the power-up results in an error message indicating that the protocol library was lost, do not proceed with using the pump
Return the pump to the appropriate department for evaluation
Click Next Page to continue.
9-02_07
Alarms
Help Screens
When certain alarms occur, additional information will be available by pressing Help
The help screens describe the steps you can follow in order to solve the current issue that is causing the alarm
When an alarm occurs, press Silence to quiet the alarm
Click Next Page to continue.
9-03_01
Alarms
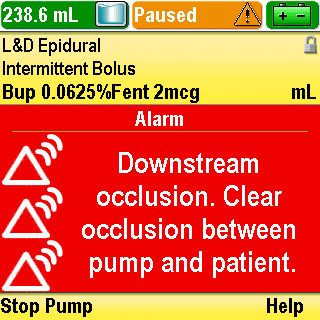
Help Screens
If help screens are available for the alarm, the word Help will appear above the right soft key
Click Next Page to continue.
9-03_02
Alarms
Help Screens
Here, is an example of a high priority alarm that has help screens
The alarm has alerted you to a downstream occlusion
Press Silence
Click Next Page to continue.
9-03_03
Alarms
Help Screens
Now press Help to view instructions on the help screen
Click Next Page to continue.
9-03_04
Alarms
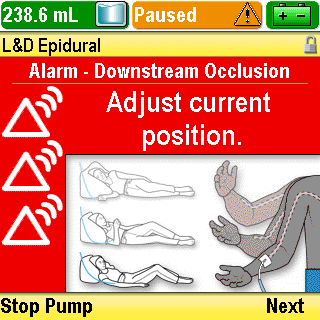
Help Screens
You can page through all available help screens by repeatedly pressing Next
Click Next Page to continue.
9-03_05
Alarms
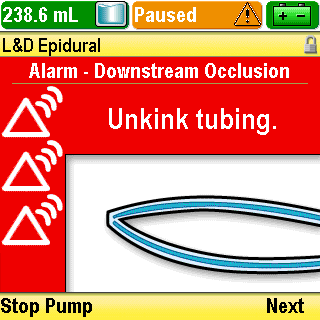
Help Screens
You can page through all available help screens by repeatedly pressing Next
Click Next Page to continue.
9-03_05-01
Alarms
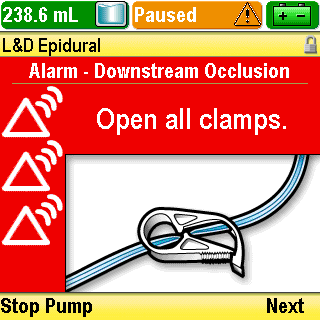
Help Screens
You can page through all available help screens by repeatedly pressing Next
Click Next Page to continue.
9-03_05-02
Alarms
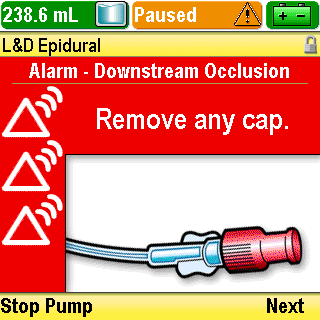
Help Screens
You can page through all available help screens by repeatedly pressing Next
Click Next Page to continue.
9-03_05-03
Alarms
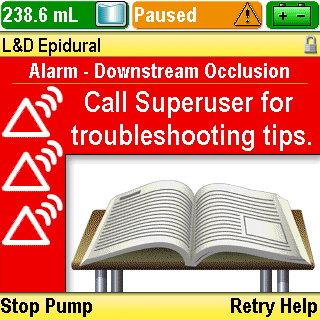
Help Screens
You may press Retry Help to repeat the help screens
Click Next Page to continue.
9-03_06
Alarms

Help Screens
When the condition that triggered the alarm has cleared, an informational alarm will appear
Click Next Page to continue.
9-03_06-01
Alarms
Help Screens
If the pump is stopped, you may restart the pump, if appropriate
Click Next Page to continue.
9-03_06-02
Alarms
Review
A high-priority alarm is accompanied by a red screen, the pump will keep running, and the alarm will continue until you press a key on the pump or correct the condition that triggered the alarm.
True or False?
Click Next Page to continue.
9-04_01
Alarms
Review
False:
A high-priority alarm is accompanied by a red screen, the pump will stop if it is running, and the alarm will continue until you press a key on the pump or correct the condition that triggered the alarm.
Click Next Page to continue.
9-04_02
Alarms
Review
When an alarm occurs, press Silence to quiet the alarm. If help screens are available for the alarm, the word Help will appear above the right soft key.
True or False?
Click Next Page to continue.
9-04_03
Alarms
Review
True:
When an alarm occurs, press Silence to quiet the alarm. If help screens are available for the alarm, the word Help will appear above the right soft key.
Click Next Page to continue.
9-04_04
Conclusion

Conclusion
This completes the training program for the CADD®-Solis ambulatory infusion pump
This training program is a supplement to hands-on training that your facility will provide to you
Contact your facility’s education coordinator with any questions
Thank you!
Click Next Page to continue.
10-01_01